

Apple has released Mavericks (OS X 10.9), but before you rush out and install the new OS, you’ll want to get your Mac ready for the upgrade.
As with Mountain Lion (OS X 10.8) last year, and Lion (OS X 10.7) before that, Apple is advertising Mavericks as a major upgrade that’s nevertheless simple to install. But as with every big upgrade to OS X, there are a few things you can do before upgrading to ensure that your Mac is ready to go.
What you need
The new version of OS X supports any Mac that works with Mountain Lion and is already running OS X 10.6.8 or later. That list of compatible models is:
- iMac (Mid 2007 or newer)
- MacBook (Late 2008 Aluminum, or Early 2009 or newer)
- MacBook Air (Late 2008 or newer)
- MacBook Pro 13-inch (Mid-2009 or newer)
- MacBook Pro 15-inch (Mid/Late 2007 or newer)
- MacBook Pro 17-inch (Late 2007 or newer)
- Mac mini (Early 2009 or newer)
- Mac Pro (Early 2008 or newer)
- Xserve (Early 2009)
(Note that while the above computers can install Mavericks, some features, such as Power Nap, AirPlay mirroring and extended desktop, and AirDrop, have stricter requirements.)
Apple also says you need at least 2GB of RAM (memory), but in my experience, you’ll enjoy better results with at least 4GB. If you have only 2GB installed—and especially if you have only 1GB—you should consider a hardware upgrade, if that’s possible with your particular Mac model, before installing Mavericks. A word of advice here: If you don’t buy your RAM directly from Apple, be sure you get RAM that’s specifically guaranteed for use in Macs. Some third-party RAM that’s not up to Apple’s specs will cause problems when you upgrade your OS. Most reputable vendors will make it clear which RAM they offer is specifically compatible with Macs.
Similarly, Apple states that you should have at least 8GB of free space on your Mac’s drive to install a major OS X update, but I recommend playing it safe by aiming for 15GB to 20GB—the Mavericks installer itself is 5.3GB in size, and you'll need some room for temporary files. (You may also find, especially if you’re upgrading from Snow Leopard, that some of Maverick’s features require more “everyday” free space, as was the case with Lion and Mountain Lion.) If you need to free up space on your drive, you can use a utility such as WhatSize or GrandPerspective to help you find big files you can get rid of.
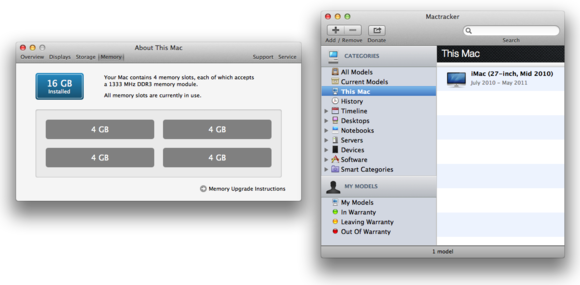
Not sure which Mac you own or how much RAM or free drive space it has? Choose About This Mac from the Apple Menu, and then click More Info. In Mountain Lion and Lion, the resulting window displays, by default, your computer model and year/version. Click the Storage tab to view your drive’s free space, and click Memory to check the amount of RAM. In Snow Leopard, you get a System Profiler window—select Memory to check the RAM amount; select Serial-ATA, and then select your drive’s name on the right, to see your free drive space.
Unfortunately, Snow Leopard’s System Profiler window doesn’t display your Mac’s actual model year/version. However, the excellent Mactracker (Mac App Store link) makes it easy to find this information. Just launch MacTracker and select This Mac on the left, and your Mac’s MacTracker entry—complete with its official model year/version—is displayed to the right.
The requirement that your Mac be running OS X 10.6.8 or later (including any version of 10.7 or 10.8) is also important. The main reason for this restriction is that, like Lion and Mountain Lion before it, Mavericks is available only via the Mac App Store: The Mac App Store requires Mac OS X 10.6.6, and Apple recommends OS X 10.6.8 because of enhancements it provides that make upgrades to later versions of OS X go more smoothly.
In addition, Apple recommends—and so do I—that you install the very latest updates to Snow Leopard, Lion, or Mountain Lion (whichever you’re currently runnning) before upgrading to Mavericks, so be sure to check for any available updates. (See “Pre-install tasks,” below.)
What if you’ve got a Mavericks-compatible Mac that’s still running Leopard (OS X 10.5)? The easiest option is to purchase Snow Leopard and install it first, then upgrade to Mavericks when available. You’ll still be paying a reasonable price for a huge OS upgrade.
Finally, I’ll repeat a recommendation I’ve made every year since Lion was released: If you’ve got a desktop Mac, I highly recommend picking up Apple’s Magic Trackpad if you don’t already have one. The systemwide gestures introduced in Lion, and expanded in Mountain Lion, continue to become more pervasive as OS X evolves, and you won’t enjoy the full benefits of Mavericks without a trackpad. (MacBook users, of course, all have a trackpad already.) I personally still prefer a mouse or large trackball for general “mousing around,” but I keep a Magic Trackpad within reach, as well, just to take advantage of OS X’s gesture-based features. It’s my Magic Gesturepad.
Pre-install tasks
While Apple describes the process of upgrading to Mavericks as a simple download and install, those of us who’ve been doing this for a while know that a major OS update is never that simple. Perform the following tasks before the upgrade and you’ll have a much better chance of actually enjoying a pain-free experience.
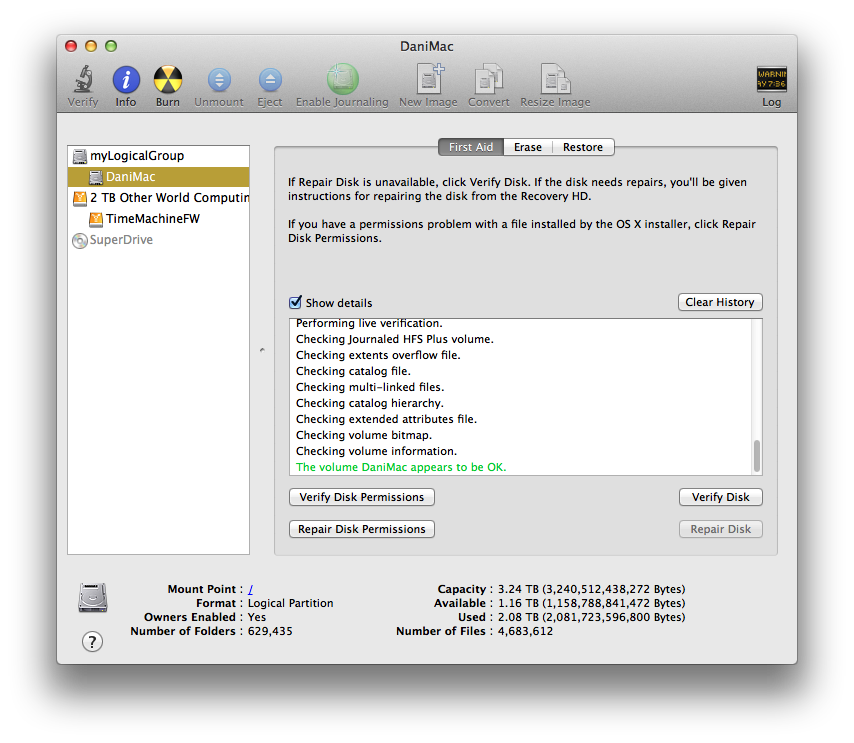
Make sure your Mac’s startup drive is in good health To do so, open Disk Utility (in
/Applications/Utilities), select your startup drive in the list on the left, click the First Aid tab to the right, and then click Verify. If Disk Utility finds problems, you’ll need to boot from a different volume to perform the actual repairs using the Repair Disk button. If you’re upgrading from Lion or Mountain Lion and your Mac can use OS X Recovery (known in Lion as Lion Recovery), you can boot into recovery mode (by holding down Command+R at startup) and use Disk Utility from there to perform the repairs.
Alternatively, if you previously created a bootable Mavericks-install drive, a bootable Mountain Lion-install drive, a bootable Lion-install drive for older Macs or for newer Macs, or created a separate Recovery drive, you can boot from that drive and use Disk Utility. If you’re upgrading from Snow Leopard, you can also use Disk Utility when booted from either your Snow Leopard Install DVD or the OS X Install DVD or thumb drive that shipped with your Mac.
If you’re feeling especially cautious, you can also opt to run Apple Hardware Test (for Macs released before June 2013) or run Apple Diagnostics (for Macs released in June 2013 or later). Both check your Mac for other hardware issues, such as bad RAM.
Back up your Mac, and test that backup Let me say that again: Back up your Mac, and test that backup—before installing Mavericks. (See our article on Mac backup plans for more info on backing up your Mac.) I personally recommend creating a bootable clone backup using SuperDuper or Carbon Copy Cloner, although a Time Machine backup will do, as well. (The advantage of a clone backup is that you can get back up and running immediately if something should go wrong—a clone is a complete, bootable copy of your drive. The advantage of a Time Machine backup is that it keeps the most-recent and older versions of your documents. I personally back up using both methods.)
To test a clone or other bootable backup, use the Startup Disk pane of System Preferences to boot from the backup drive and verify that everything works just as if you were booted from your Mac’s main drive. To test a Time Machine or other non-bootable backup, try restoring several files—both older ones and newer ones—to make sure you can recover your data should disaster strike.
Snow Leopard users only: Disable FileVault If you’re upgrading from Snow Leopard (OS X 10.6) and you’re using FileVault, OS X’s built-in account-encryption feature, on any of your Mac’s accounts, I recommend disabling FileVault before upgrading to Mountain Lion. Mavericks, like Mountain Lion and Lion before it, uses a different (and much-improved) approach to encryption, called FileVault 2. Apple says you can keep using the Snow Leopard implementation for previously-encrypted user accounts, but FileVault 2 is a much better way to go, so now’s as good a time as any to switch. (As I noted in my previous upgrade guides, I also prefer to not test Murphy’s Law by risking any incompatibilities between the two versions of FileVault.) Once you've successfully installed Mavericks, you can enable FileVault 2 in the Security & Privacy pane of System Preferences.
Disable third-party disk encryption Similarly, if you’re using third-party full-disk-encryption software, you may want to temporarily disable that encryption before upgrading your Mac’s OS. Most of these products interact with your drive and the OS at a low level, and an incompatibility with Mavericks could leave you unable to boot your Mac or, worse, unable to access your data at all. Once Mavericks is up and running and you’ve verified (with the developer) that your encryption software is compatible with OS X 10.9, you can re-enable encryption. However, given that FileVault 2 encrypts your entire drive, you might consider this an opportunity to migrate to OS X’s built-in encryption feature.

Check for system updates and updates to other Apple software You’ll want to be sure you’ve installed both the latest updates to your currently installed version of OS X—those updates may include changes that are required for upgrading to Mavericks—and the latest versions of any other Apple software that might be affected by the upgrade. To do this in Mountain Lion, you open the Mac App Store app and check the Updates screen; any available updates to Mountain Lion and Apple software will appear at the top of the window. In Lion and Snow Leopard, you should run Software Update (accessible from the Apple menu). Regardless of your version of OS X, you should also check for updated firmware for your particular Mac model.
Check for Mavericks-compatible updates to third-party software As with any major upgrade to OS X, you’ll likely find that some of your third-party software needs to be updated to work with Mavericks. If you take some time to check compatibility before installing OS X 10.9, you’ll be in a position to get up and running immediately, rather than being frustrated by your favorite apps and add-ons not working.
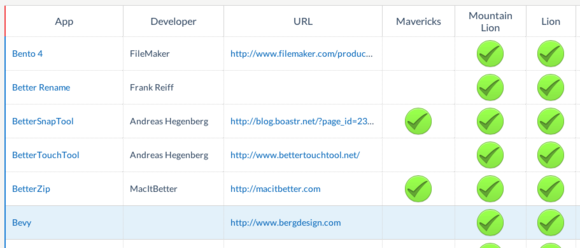
To check compatibility, you can visit the website for each individual app and system add-on, but I recommend first checking RoaringApps’ list of Mac software compatibility. (The list includes columns for various versions of OS X—be sure to look at the Mavericks column.) Given that Mavericks hasn’t yet been released, the list isn't yet anywhere close to being exhaustive, but it will start to fill in quickly as more and more people install and use Mavericks.
However you check for compatibility, if an app has an update available, you’ll want to download and install that update. For apps you’ve obtained via the Mac App Store, this is as simple as launching the App Store app, clicking the Updates button in the toolbar, clicking Update All, and providing your Apple ID and password when prompted. This will download and install all available updates to Mac App Store-purchased software at once.
For non-Mac App Store apps, you’ll need to manually install updates. Some apps provide a built-in update feature (often accessed by choosing Check For Updates from the application’s Application Name menu or its Help menu); for those that don’t, you’ll need to visit the developer’s website, download the latest version, and install it yourself.
When it comes to software that’s incompatible with the new version of OS X, the biggest offenders will likely be programs and system add-ons that integrate with (or hack) the OS at a low level. Kernel extensions, for example, are notorious for being incompatible with major new versions of OS X, but you may also find that utilities that tweak the Finder, add-ons that improve Mail, and other plug-ins and “enhancers” that work fine under your current OS installation won’t work under Mavericks. (This will be especially likely for people upgrading from Snow Leopard.) Since most of these types of apps and add-ons aren’t allowed on the Mac App Store, be sure to check vendor websites for OS X 10.9-compatible updates beforeupgrading. (Don’t forget to check third-party System Preferences panes, Mail add-ons, menu-bar apps, and Web-browser plug-ins.) If it turns out that a particular bit of software is incompatible with Mavericks and doesn’t have an update available, uninstall or disable that software until a compatible version is released.
Snow Leopard users only: Check for really old software If you’re still running Snow Leopard (OS X 10.6), you may have a few PowerPC programs—software that was never updated to run natively on Macs with Intel processors—on your drive. Under Snow Leopard and earlier versions of OS X, Apple provided software called Rosetta that allowed PowerPC code to run on Intel Macs. In Snow Leopard (OS X 10.6), Rosetta was no longer installed by default, but the OS would offer to download and install Rosetta if you tried to run a PowerPC program. However, Apple killed Rosetta completely when Lion (10.7) was released, and it remains unavailable in Mavericks.
This means that any PowerPC apps you’ve been using under Snow Leopard won’t work at all in Mavericks. If you’ve got important PowerPC programs (for example, older versions of Quicken for Mac are still surprisingly popular), you’ll need to update those programs to Intel-processor versions, if available, before upgrading to Mavericks. If such updates aren’t available, you’ll want to find acceptable alternatives, whether those are modern Mac alternatives or, if need be, Windows versions that you can run under Boot Camp or virtualization software such as Parallels or Fusion.
How can you tell which of your applications are PowerPC programs? The easiest way is to launch Snow Leopard’s System Profiler utility (in
/Applications/Utilities), select Applications (under Software in the sidebar), and then click the Kind column header, which sorts the list of applications by processor type. Any programs listed as PowerPC will not work under Mavericks, Mountain Lion, or Lion. (If you’ve got any listed as Classic, that ship sailed long ago.)
Set up your iCloud account Apple’s cloud-syncing service, iCloud, is heavily integrated into many apps and system services. (This integration started in Lion, but it’s become increasingly more prevalent with each major OS X update.) To avoid being hassled about iCloud syncing when you first log in to your new Mavericks installation, simply make sure that you’re logged in to your iCloud account, and that you’ve enabled syncing for the various types of supported data,before upgrading—you’ll just need to provide your iCloud password once you boot into Mavericks. (If you’re upgrading from Snow Leopard and you don’t yet have an iCloud account, you’ll be prompted to create one once you boot into Mavericks for the first time.)
Suggestion: Have an extra drive handy While most people will simply install Mavericks over Mountain Lion, Lion, or Snow Leopard, there are situations in which you might want to install onto an empty drive. For example, if you want to install Mavericks on a second drive to test the OS before upgrading your main drive, or if you want to erase your Mac’s startup drive and start anew. (The latter might be a good idea if your Mac has been having issues, or if your drive is nearly full or in need of repair.) As I’ll cover in an upcoming article on installing Mavericks, installing onto a secondary drive is simple. However, erasing your Mac’s startup drive and starting fresh means having a good, tested backup (see above) as well as a bootable Mavericks install drive, so now’s the time to start preparing.
