With the Edinburgh arts festival around the corner, Adobe won another 'Amused Moose Award' nomination with After Effects CC, expanding the software’s capabilities and refining the tools that professional filmmakers and motion-graphics artists depend on. Further enhancements in performance make After Effects CC a must-have partner for animators and video editors working with Premiere Pro CC.
New features such as a live 3D workflow with Cinema 4D Lite, now included with Creative Cloud, give motion-graphics artists and compositors much-needed integration with true 3D object animation.
In addition, several upgraded tools—including the Refine Edge Tool (for use with Roto Brush), Warp Stabilizer VFX, and Pixel Motion Blur—make the CC version a substantial revision for compositors and animators. Also new are the enhanced 3D Camera Tracker, bicubic sampling for layers, and the ability to send a comp to render through the Adobe Media Encoder, which allows you to continue working in After Effects while your project renders in the background.
For me, however, the real beauty of Adobe’s Creative Cloud is the ability to sync user profiles and preferences between machines and to access software and settings when working remotely—simply by signing in to Creative Cloud.
Above the clouds
The benefits of Creative Cloud have turned out to be the most talked-about topic since Adobe’s announcement of the subscription-only program. The two primary benefits are continuous upgrades and the accessibility and flexibility of the software license. As a user, I no longer have to wait for new features or tool enhancements, because they become available as soon as the developers test them and ready them for distribution—they aren’t restricted to an arbitrary schedule.
Better still, my license can follow me wherever I’m working. Working animators and motion-graphics specialists often have long-term assignments on-site with clients who may not have the latest software. Because I have the option to log in to Creative Cloud, I can download and install After Effects CC (or any other CC software) and use it on my clients’ machines. Once I’m done for the day, I log out; the software remains installed, but it is not functional until I log back in again on my next visit. The best part is being able to sync my user preferences and settings when I change machines. This way, After Effects CC looks and feels exactly the same no matter where I’m working on a particular day.
Roto Brush gets a boost
The Roto Brush is my favorite tool because I rely on it for my compositing work. With the addition of the Refine Edge Tool, getting a clean edge around features such as hair, animal fur, or even trees on the horizon is as easy as wiping a brushstroke over the edges where you need more detail.
Simply use the Roto Brush to select the general area you want to track, just as in After Effects CS6, and then select the Refine Edge Tool to paint over the edges that need more detailed refinement, such as the trees against the sky. This arrangement allows me to either give a different effect or color-grading treatment to the sky than to the foreground, or replace it altogether.
Also added in the Refine Edge settings are Refine Hard Matte, which smooths the often aliased edges of a mask, and Refine Soft Matte to allow a soft feather in an alpha channel without pixelation.
Enhanced tools and features
Adobe updated many other tools and effects, such as the 3D Camera Tracker, which now allows you to define a ground plane or reference plane. Now, repetitive track points are deleted along the track path when you delete the first selection, which optimizes the tracking data where objects in motion aren’t needed to track in the scene.
The Warp Stabilizer VFX effect replaces the previous Warp Stabilizer and provides better control. Some key features added to the effect are Preserve Scale, Objective, and Auto-delete Points Across Time. Reverse Stabilization and Apply Motion to Target are helpful for stabilizing shaky footage.
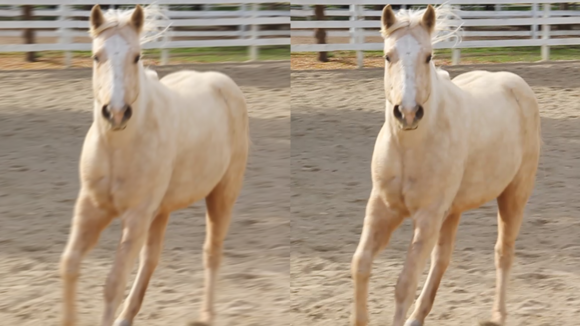
The new Pixel Motion Blur effect is one I’ve been expecting for a long time, and is particularly useful when I’m trying to match animations, motion graphics, and high-frame-rate video to slow-shutter film-look footage shot at 24 fps. In the past, the only motion-blur control you had in After Effects was if an object or layer was physically moving on the Timeline. Otherwise, you could apply motion blur to video footage or rendered animations only by using masked areas of Directional Blur or by employing a third-party effect such as RE:Vision FX Reel Smart Motion Blur (RSMB).
In the side-by-side example below, the original footage (on the right) was shot at 60p and has an annoying high-frame-rate look to it, with no motion blur from the camera movement or the movement of the horse. However, with the Pixel Motion Blur effect applied, only the pixels in the highest degree of motion are blurred, giving a much softer effect similar to that of film shot with a slower shutter.
Some other great new features include bicubic sampling of layers, similar to scaling in Photoshop, plus footage clip reloading and a function to find missing files, effects, and fonts. Also, Adobe added improved import/export modes and encoding options, along with other enhanced usability features.
New 3D capabilities with Cinema 4D Lite
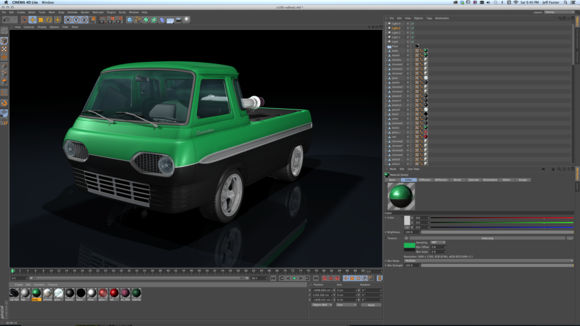
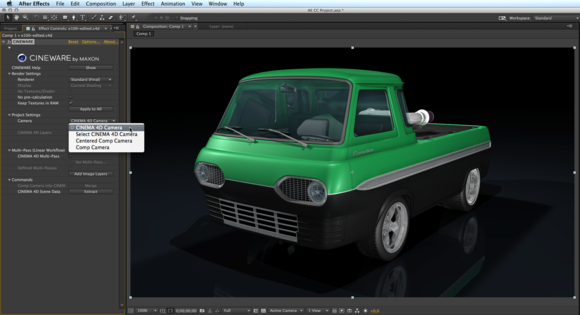
Since Adobe’s introduction of Ray-Traced 3D in After Effects CS6, users have been wanting more 3D integration. The big announcement for After Effects CC is the inclusion of the Cineware effect plug-in that allows you to use Cinema 4D files in your composition—with Cinema 4D as a renderer. A streamlined version of Maxon Cinema 4D (Cinema 4D Lite) is included with Creative Cloud, and you can upgrade it to the full version at a discount.
You can create a new C4D file from inside After Effects CC, which launches the Cinema 4D Lite app. The tools and features are somewhat limited compared to the full-license version, but you can still do some basic modeling, object animation, and camera moves inside the app. You can also open existing C4D models, complete with their texture and bump maps. All the material manager features appear to be identical, and you can easily edit maps in Adobe Photoshop CC.
Once you’ve completed your edits in Cinema 4D Lite, you simply save the file and return to After Effects CC, and the comp updates automatically.
Using the Cineware effect plug-in, you can select the Cinema 4D Lite camera or create a new 3D comp camera to control the views and animations.
One caveat, however, is that you can be only in Classic 3D mode–not Ray-Traced 3D. This limitation means that After Effects lights will have no effect on the C4D layers, nor will any 3D layers interact with or integrate into the 3D scene. You have to create or animate all of your 3D objects and text inside of Cinema 4D Lite if you want those items to be integrated with one another in reflections, shadows, and interactivity.
AME buys you some time
A big boost in productivity comes from the new menu/keyboard option to send a comp to Adobe Media Encoder (AME) to render in the background instead of locking up After Effects for a lengthy render. This means you can continue to work on other comps in your project instead of waiting for a render to complete.
Bottom line
Adobe After Effects CC is now more accessible than ever. Whether you’re upgrading from a previous version or ready to dive in for the first time, you won’t be disappointed with the flexibility the Creative Cloud model offers. The updates in this first release of the CC version are equivalent to those of a major version release, but knowing that we don’t have to wait another 18 months for even more updates and new features is a huge bonus. I’m especially interested to see where the program goes in 3D functions now that Cinema 4D is part of the workflow, and I would really like to see more integration with Ray-Traced 3D layers.
Contact us here to enquire about purchasing options for Adobe CC.


