

Contacts was called Address Book in previous versions of the Mac OS, and that’s still its most descriptive name. What with its faux-leather border and stitched pages, it reminds you of something in which your parents might have added a new neighbor or business contact. But, old-school though it may look, it has more powerful features than its paper-and-glue counterpart.
Contacts overview
Now that you’ve had the chance to admire Contacts’ leather look, let’s peer beyond the obvious. Contacts is broken into three main sections—from left to right, groups, members of the selected group, and the card for the currently selected contact. For example, when you select All Contacts at the top of the group pane on the far left, you’ll see every contact that you have in the second pane. If you select one of those contacts, that person’s information appears in the third pane. (If you don’t see the group pane, choose View > Groups.)

When you launch Contacts for the first time, what you see depends on whether you have an iCloud account and whether that account is configured for your Mac. If both are true, Contacts will include any contacts you’ve added on another iCloud-compatible device. If you’ve created any groups on such devices, they too will appear in Calendar. Such is the power of iCloud syncing.
If your new Mac is your first iCloud device or you haven’t set up your Mac to use iCloud, you’ll simply see an All My Contacts entry in the group pane and a whole lot of nothing to the right. No one should be this friendless. Let’s add a contact or two.
Creating contacts
Creating contacts is a cinch. Choose File > New Card (<Command>-N) or click the Plus (+) button at the bottom of the second column. The third column will display a series of empty fields, just ripe for the filling. Filling a field is just as easy. Click in the field and enter what information you want. Headings that include up-and-down pointing triangles indicate that a subset of selections is offered. For example, if you click on Mobile you’ll see that you can choose from a wide variety of phone types—mobile, iPhone, home, work, main, home fax, work fax, other fax, pager, other, and custom. When you click on Custom, you can create a label of your own.
When you enter information in one of these fields, another similar field within that category appears below. For instance, you’ve entered Chuck Dickens’ iPhone as 07795 904805. As soon as you enter the first digit, another field appears below, ready for you to enter his home number.

You can delete existing entries by clicking the Minus (–) button that appears next to them. When you’re finished with your work, click Done. Only those fields that have information in them will appear on the card.
The first card you should create is your own. This is important to do because other applications can access this card and put it to good use. For instance, they can autofill fields with your contact information rather than forcing you to do it manually. And once you’ve created this card you’ll find these helpful commands when you choose Card > Share My Card: Email My Card, Message My Card, and AirDrop My Card. When you’ve created such a card, clickDone to save it, and then choose Card > Make This My Card.
Configuring contact fields
By default, Contacts includes fields you’d typically find in your standard-issue address book. First and last name, company name, phone, email, home page, chat ID, address, and note. If you’ve configured the Mail, Contacts & Calendars system preference to include Facebook, Twitter, Vimeo, and Flickr accounts, you’ll find entries for them as well. But you’re not limited to just these entries.
Choose Card > Add Field, and you find more items that you can add to a contact card—phonetic first/last name, prefix, middle name, suffix, nickname, job title, department, maiden name, birthday, date, related name, and profile. For example, if you have a contact for which you pen a yearly holiday card, you might wish to make a note of the person’s family members. You do this by adding a related name. A new field appears from which you can choose mother, father, parent, brother, sister, child, friend, spouse, partner, assistant, manager, or other. And, if you like, you can click Custom and add “No idea, but they hang out a lot.”

If you use one of these fields more often than not, I suggest you change the contact card’s template. To do that, choose Contacts > Preferences, click the Template tab, and then click the Add Field pop-up menu to add the fields you want. In this same window, you can choose which headings appear by default. For instance, Apple has chosen to show Mobile as the default heading for phones. You can select Work instead, and when you create a new card, Work is what will appear as the default phone heading.
Should you employ Contacts for personal use, you should add the Birthday field to the template. When you do this and then go to the trouble to add contacts’ birthdays, those important dates will automatically appear in the Calendar application when you enable its Birthday calendar.
The power behind headings
Some features are so delightful to discover that I almost feel like I’m spoiling the surprise by pointing them out to you. So I’ll be a bit vague here, and you can find out for yourself.
When you click a heading—Home, Work, Mobile, or the like—a menu will appear with a list of helpful commands related directly to the kind of information found in that field. For example, if you click Work in a phone field, you’ll see Show in Large Type (great for seeing phone numbers from across the room), Send Message, and FaceTime. Click other headings and see what you can find. (Hint: Need to map a contact’s street address? You’re in luck.)
Creating groups and smart groups
As I mentioned, Contacts has singular advantages over “real” address books. One is that you can create groups of contacts—your business associates, friends, family, bowling teammates, and political action committee members. To create a group, choose File > New Group (<Shift>-<Command>-N) and name your group. That group appears in the group pane.
To add members to your group, just select All Contacts, select the contacts you want to add to the group, and drag them in. They’ll continue to appear in All Contacts because, well, it includes all of your contacts. But they’ll also appear in the group. Should you delete someone from a group—because your sloshball team’s third baseman has concentrated on the slosh to the exclusion of the ball—that person remains in your All Contacts list. Delete them from All Contacts, and they’re truly gone.
Back in our Fall term, I described the workings of Smart Folders in the Finder. Contacts has its own smart technology, called Smart Groups. And the idea is similar. You set up a condition (or series of conditions) to gang together contacts that meet those conditions.
Let’s say you want to have a group that includes those people who live nearby. You could do this in a couple of ways.
Choose File > New Smart Group (<Command>-<Option>-N). In the sheet that appears, enter ‘Nearby’ in the name field. Click the first pop-up menu, and chooseZip. Configure the next pop-up menu to read Is, and then, in the field to the right, enter your zip code. Click OK, and a Nearby smart group will appear that contains contacts who live within your postal code.
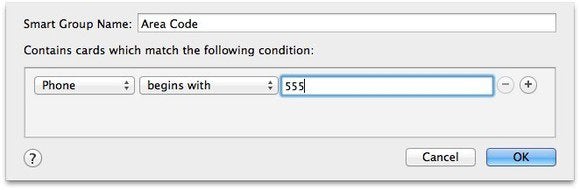
You can do something similar with your phone number. In this case enter Phone Begins With and then enter your local area code. The only hitch here is that you’re searching an area broader than a postal code. Also, some people’s mobile phones use an area code that differs from the code currently assigned to where they live.
You could also create a smart group that includes just those contacts that you want on your iPhone. For instance, you may wish to carry only those contacts who have a phone number and email address in their card. It’s easy to create a smart group that includes two conditions to make this happen: Phone is set and Email is set. Then choose to sync this group to your iPhone and leave the rest behind.
About distribution lists
You now know that you can create groups of contacts. Suppose that some of these contacts have multiple email addresses, physical addresses, and phone numbers. Suppose further that another application will automatically grab some of this information for its own use. For example, Mail will automatically insert Charlie Bucket’s work email address when you compose a message to him. Suppose one last time that you want Mail to always use his home address. How do you set the default for other applications’ use?
Through the careful use of distribution lists. Choose Edit > Edit Distribution List,and a sheet will appear. On the left side is a list of your accounts with a triangle next to each. Click that triangle, and any groups in that account will appear. Select a group, and you’ll see the contacts within it.

When a contact includes multiple instances of an email address, phone number, or physical address, you’ll see one of these items in black—any other similar entries are in gray. To choose the default information that you’d like to use—a person’s work email address versus their personal address, for example—click on it. It will turn black, which tells you that it’s now the default.
Adding accounts
Services such as Yahoo and Google allow you to create contacts. And it’s likely that you’ll want to have those contacts appear within the Contacts application. For a Yahoo account, this is dead simple. When setting up such an account in the Mail, Contacts & Calendars system preference, just be sure to enable the Contacts option, and your Yahoo contacts will appear in Contacts.
Google is a bit trickier because there is no Contacts entry for Gmail accounts within Mail, Contacts & Calendars. It can still be done, however.
Within Contacts, choose Contacts > Preferences and click the Accounts tab. Select the On My Mac entry, and enable the Synchronize With Google option. In the sheet that appears, enter your Gmail name and password, and click OK.Contacts will now set about synchronizing with Google and import those contacts it has. If an On My Mac heading doesn’t appear once this synchronization takes place, quit and relaunch Contacts. You should now see such an entry along with an All On My Mac group below. An iCloud entry will appear above if you’ve already synced iCloud contacts.
In the case where you have the same contact in different accounts—one version in iCloud and another from Facebook, for example—Contacts will attempt to merge them. You can tell if a contact has been merged by the Cards entry in the contact. It will read something like Cards: On My Mac, iCloud.
Sharing contacts
The Contacts application, like just about every address book application on earth, supports the vCard standard. This is a common contact format that allows easy export and import of contact information.

Exporting contacts is quite easy. One method is simply to drag a contact to the desktop, where it turns into a vCard file. (You can also select multiple contacts and drag them to the desktop, where all of the contacts will be combined into a single vCard file.) In addition, you can drag a group to the desktop to turn that group into a single vCard. Or, if you like, click on the Share icon at the bottom of a contact card. You’ll find such options as Email Card, Message Card, and AirDrop card. The resulting card will also be in the vCard format. And you can select contacts and choose File > Export > Export vCard.
Importing contacts works similarly. Grab a vCard and haul it into a list of contacts. Or drop the vCard on the Contacts icon in the dock. Or choose File > Import, navigate to the vCard, and click Open.
About printing
One feature that escapes even advanced users is the ability to print your contacts in useful ways. Select some contacts and choose File > Print. If you see a Show Details button at the bottom of the resulting window, click it. Click the Style pop-up menu in the now-expanded print window, and you discover that you can print mailing labels, envelopes, lists, and pages for a pocket address book. When choosing labels you’ll find the option to select a specific kind of label—Avery Standard, Avery A4, and Dymo.
Contacts is hardly the most complicated or comprehensive application bundled with the Mac, but it’s more than capable of dealing with basic contact management. If you’ve been tied to paper for years for fear of the complexity that a computer-based contact application might introduce, you can put that anxiety aside. Go forth and make contacts.
