

Hide the Reply-All-ers
Tool: Mail
Like every company, we here at Macworld deal with groups inside our organization who believe clicking Reply All is a proper response to any “Welcome Bob!” or “Great Work, Team!” message that crosses the wire. Thankfully, these people tend to cluster in their own domain—something along the lines of @wehavenoclue.com. So I created a Mail rule to handle their effusions: In the Inbox Rules section of the Rules tab in Mail’s preferences, I added a rule that looks for messages in which the From field contains that domain, then performs the action Move Message and specifying a separate mailbox as the destination. I can then peruse that box when my patience allows.—Christopher Breen
Like every company, we here at Macworld deal with groups inside our organization who believe clicking Reply All is a proper response to any “Welcome Bob!” or “Great Work, Team!” message that crosses the wire. Thankfully, these people tend to cluster in their own domain—something along the lines of @wehavenoclue.com. So I created a Mail rule to handle their effusions: In the Inbox Rules section of the Rules tab in Mail’s preferences, I added a rule that looks for messages in which the From field contains that domain, then performs the action Move Message and specifying a separate mailbox as the destination. I can then peruse that box when my patience allows.—Christopher Breen
Keep Track of Shipments
Tools: Delivery Status, Mail
I routinely shop online and easily lose track of when packages are scheduled to be delivered. So I use Delivery Status from Junecloud—which includes an iOS App, Dashboard widget and cloud service—to keep an eye on incoming packages. Among other features, the service allows me to forward order and shipment-confirmation emails to JuneCloud, which parses their text and adds their tracking information to the app. So I created some simple Mail rules to handle this forwarding automatically.
I routinely shop online and easily lose track of when packages are scheduled to be delivered. So I use Delivery Status from Junecloud—which includes an iOS App, Dashboard widget and cloud service—to keep an eye on incoming packages. Among other features, the service allows me to forward order and shipment-confirmation emails to JuneCloud, which parses their text and adds their tracking information to the app. So I created some simple Mail rules to handle this forwarding automatically.
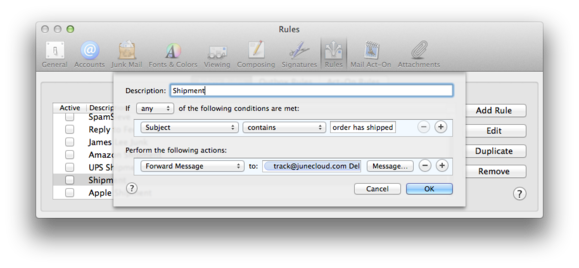
First, there’s a rule that looks for any subject that contains the words
order has shipped and then forwards such messages to track@junecloud.com. This catches most of the relevant messages. You can create other, more customized rules for particular vendors. For example, I have one that looks for (and then forwards) messages in which From containsshipping_notification@orders.apple.com.—Katie FloydFile Mail messages to Evernote
Tools: Evernote, TextExpander
I use Evernote to store and manage all kinds of documents. One thing that makes it more efficient: Evernote gives every user a unique email address, which you can use to send documents to your Evernote account. Email messages sent to that address are usually saved in your default notebook. But with a little planning, you can organize and tag notes more precisely.
I use Evernote to store and manage all kinds of documents. One thing that makes it more efficient: Evernote gives every user a unique email address, which you can use to send documents to your Evernote account. Email messages sent to that address are usually saved in your default notebook. But with a little planning, you can organize and tag notes more precisely.
The subject of the email becomes the title of the note in Evernote. To specify a notebook where that note will be filed, adding the
@ symbol followed by the name of an existing notebook to the subject line. Similarly, you can tag the note by appending#, followed by an existing tag, to the subject.
If you find yourself sending messages to the same set of notebooks and tags routinely, you can automate this tagging process with a TextExpander snippet. For example: I’m going back to school this year and want to keep track of the associated expenses. In Evernote I keep a notebook called Tax Receipts for every year, as well as an Education tag; I also like to include date information with each note. So I created the following snippet in TextExpander to use as the subject of my message:
%Y.%m.%d %filltext:name=Note Subject% @Tax Receipts %Y #Education
The first part of that snippet inserts a date stamp. The second part of the snippet creates a single-line pop-up field that prompts me to enter the subject of the note, such as the type of receipt. The final part of the snippet denotes the specific notebook using a custom Year snippet (so I don’t have to update the snippet every year) and a tag.—Katie Floyd

Forward emails with special formatting
Tools: Keyboard Maestro, Mail
Dozens of times a day, I forward press releases from hardware and software vendors to Macworld writers; each message goes to a particular person based on the topic area. When I do so, I replace Fwd: in the subject with a standard prefix (such as iOS accessories:) to make it easier for that person to filter these messages. It’s a simple-but-tedious task, so I’ve created a bunch of Keyboard Maestro macros that perform all the necessary steps with a single keystroke.
Dozens of times a day, I forward press releases from hardware and software vendors to Macworld writers; each message goes to a particular person based on the topic area. When I do so, I replace Fwd: in the subject with a standard prefix (such as iOS accessories:) to make it easier for that person to filter these messages. It’s a simple-but-tedious task, so I’ve created a bunch of Keyboard Maestro macros that perform all the necessary steps with a single keystroke.
For example, to forward an iOS-accessory press release to our writer Joel Mathis, I created the following macro: For the trigger, I chose Hot Key Trigger from the New Trigger pop-up menu and specified Control-Option-Command-I. I then created a series of new actions: Type Shift-Command-F (Mail’s Forward Message shortcut); pause for .5 seconds (to wait for the forwarded-message window to open); paste Joel’s email address as the text; pause for .5 seconds (to wait for Mail’s autocomplete addressing feature to catch up); tab three times (to get to the Subject field); type the left arrow Keystroke (to get to the beginning of the Subject field); forward-delete three times (to remove FWD from the beginning of the subject); pasteiOS accessories (to add that text to the beginning of the message); pause for .5 seconds (to make sure Mail doesn’t get left behind); and, finally, type Shift-Command-D (Mail’s Send Message shortcut).—Dan Frakes
Replying to email with a standard greeting
Tool: Keyboard Maestro
I reply to many emails every day, and I like to thank the sender by name for getting in touch with me. So I created a simple Keyboard Maestro macro that lets me type
I reply to many emails every day, and I like to thank the sender by name for getting in touch with me. So I created a simple Keyboard Maestro macro that lets me type
hisender (Hi, Sender) to insert a suitable greeting.
First, I created a Keyboard Maestro macro that’s triggered by the text string
hisender. (You could of course use a hotkey or any other trigger that Keyboard Maestro supports.) In the Will Execute The Following Actions section, I create a variable (sender_addr) and use the Insert Token drop-down to assign that variable to the sender of the frontmost message in Mail. I then add an action to search that variable for a regular expression: ^"?([^\s]+)(.*)$. That pattern captures the first chunk of text in the sender’s name and email address. The found text string is then saved into a new variable, sender_name.
Finally, I use Keyboard Maestro’s Insert Text by Pasting command to insert my greeting, complete with the sender’s name inserted at the appropriate point:
Hi %Variable%sender_name%. That’s followed by Thanks for your message, %|%. I also position the text insertion-point after the greeting, so I can continue typing my reply.—Matt Gemmell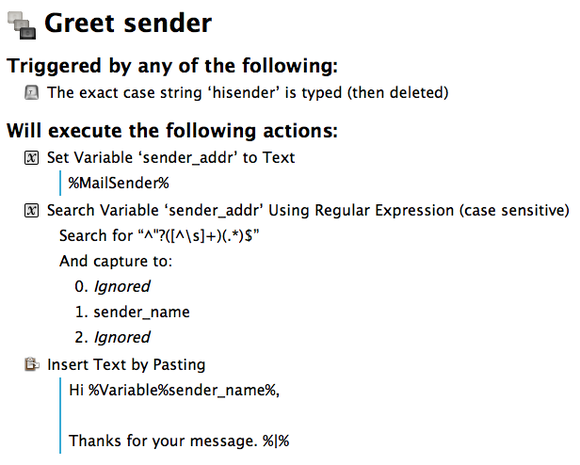
Email encrypted PDFs
Tool: Automator
Apple’s built-in support for the PDF format in OS X allows you to not only quickly view PDFs without the use of third-party software, but also to create new ones easily. One of the quickest ways to do this is to use the PDF menu in a standard print dialogue to create a PDF. And one of the handiest services in this menu is the Mail PDF option, which instead of making you first save a PDF somewhere on your hard drive then attaching it to an email message, wraps all that into one action.
Apple’s built-in support for the PDF format in OS X allows you to not only quickly view PDFs without the use of third-party software, but also to create new ones easily. One of the quickest ways to do this is to use the PDF menu in a standard print dialogue to create a PDF. And one of the handiest services in this menu is the Mail PDF option, which instead of making you first save a PDF somewhere on your hard drive then attaching it to an email message, wraps all that into one action.
But though this option is convenient, it isn’t perfect, especially for PDFs that contain sensitive data. So I created a PDF service of my own in Automator that creates and then password-protects a PDF before attaching it to an email.
To start, open Automator, and select Print Plugin from the list of possible workflows. Drag over the Encrypt PDF Documents action. You don’t need to enter a password in the Password and Verify fields, but do check the Show This Action When The Workflow Runs under Options. (Alternatively, you can use a dummy password for now.) Next, drag over the New Mail Message action as the next step in the workflow.
That done, save the workflow with a name (
Mail Encrypted PDF?); that will now appear as an option in the PDF menu at the bottom of the standard Print dialogue window. When you select it, you will be prompted to enter a password for the PDF; if you entered a dummy password above, that’ll be entered by default. When the service finished, the PDF will embed as a secure document in a new email message.—Topher Kessler
Flag emails from specific senders
Tool: Mail
I get lots of emails from my editors and colleagues at Macworld, and I’ve found it helpful to set them apart from other emails. That way, I can quickly and easily spot any urgent messages, plus it makes it easier to use my Mail inbox as my to-do list. So I set up a rule in Mail to mark these emails and notify me when they arrive.
I get lots of emails from my editors and colleagues at Macworld, and I’ve found it helpful to set them apart from other emails. That way, I can quickly and easily spot any urgent messages, plus it makes it easier to use my Mail inbox as my to-do list. So I set up a rule in Mail to mark these emails and notify me when they arrive.
In Mail, choose File > Preferences, then select Rules. Click New Rule and set the following conditions: If any of the following conditions are met; From contains macworld.com, pcworld.com and techhive.com. And I set the following actions to be performed on messages that match those conditions: Move Message to Mailbox Inbox; Set Color of Text to Other… (I set it to purple); Stop Evaluating Rules (so other rules don’t move or alter the messages); Send Notification.—Kirk McElhearn
Filter messages to specific address
Tool: iCloud
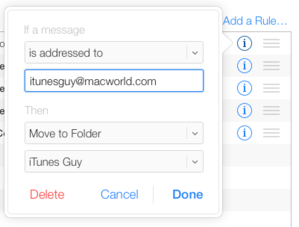
As the author of Macworld’s Ask the iTunes Guy column, I get lots of reader email, which is forwarded to an iCloud email address. Rather than filtering those messages with a Mail rule on OS X, I chose to set up a rule on iCloud. The main reason: I didn’t want them cluttering up my iPhone. Server-side rules like this work on messages before they reach your inboxes, so they apply to all of your devices.
As the author of Macworld’s Ask the iTunes Guy column, I get lots of reader email, which is forwarded to an iCloud email address. Rather than filtering those messages with a Mail rule on OS X, I chose to set up a rule on iCloud. The main reason: I didn’t want them cluttering up my iPhone. Server-side rules like this work on messages before they reach your inboxes, so they apply to all of your devices.
Sign into iCloud on the Web. Click Mail, then click the gear icon at the bottom-left of the window and choose Rules. Click Add a Rule. Set the first popup to Is Addressed To, and enter an email address there. (I use the addressitunesguy@macworld.com, because messages are redirected from the macworld.com server to my iCloud address; you might want to use Is From instead, though Is Addressed To is a fine choice for messages from discussion lists). You can also choose a specific term in the subject to filter emails. In the Then section, choose Move to Folder, then select the name of the folder on the iCloud server where you want the messages to go. Click Done to save and activate the rule.—Kirk McElhearn
Email favorite tweets
Tool: IFTTT
As I scan my Twitter stream, I often see links to articles that I’d like to read, but can’t delve into at the moment. Rather than saving them to Safari’s Reading List or to a service like Readability, I prefer sending such tweets to my email inbox, so I can process their links later, when I have time. IFTTT lets me do this automatically; all I have to do is favorite a tweet.
To set that up, I first activated the Email and Twitter channels in IFTTT. I then set up the basic recipe: If Twitter, then Email. In the action, I accept the default email subject:
Favorite tweet by @{{UserName}}. And for the body of the message, I also accept the default: {{TweetEmbedCode}} via Twitter | https://twitter.com/{{UserName}} | {{CreatedAt}}.
With that set up, I get an email a few minutes after I mark a tweet a favorite, with the tweet in the body, including the link to the article I want to read. It also gives me a record of these favorited-links messages, if I want to find an article again later.—Kirk McElhearn
Automatically file and reply to customer-support email
Tools: Mail, Sanebox, TextExpander
I self-publish books through the iBooks Store. One thing I didn’t realize when I began this side-business is that, because the books contain a lot of interactive elements, some of my readers would need customer-support. So I quickly developed an automated workflow that filters these emails to a place where they’re easier to manage and uses text-automation to make replying more efficient.
I self-publish books through the iBooks Store. One thing I didn’t realize when I began this side-business is that, because the books contain a lot of interactive elements, some of my readers would need customer-support. So I quickly developed an automated workflow that filters these emails to a place where they’re easier to manage and uses text-automation to make replying more efficient.
The first thing I do is filter these support emails to one place. For several years, I did this with rules in Mail. These rules scanned incoming messages for certain terms relating to the books. Whenever Mail got a hit, it automatically filed the message in a specific folder for me to review and process. More recently, I’ve started doing the same thing with the Web-based Sanebox service. If you’re a Gmail user, you could also do the same thing with Gmail filtering rules.
