

Even though you can set up your Mac to automatically log into your user account without a password, your computer is going to be more secure if you use one.
Of course, there’s a slight danger that a day will come when that password doesn’t work—you’ve modified your Mac in some way that’s password-unfriendly or you’ve been negligent. Or you may simply forget what your password is, which can happen if you use a standard user account for daily tasks and haven’t touched the administrators account in awhile.
Fortunately, if you have lost your password, there are several approaches you can take for either regaining complete access to your Mac or, at least, getting to the specific data you need. Here are some tips for doing just that.
Resetting your Password
Apple includes several options for resetting account passwords in OS X. The approaches I outline below depend on how much access to your Mac you currently have.
Change it from an admin account
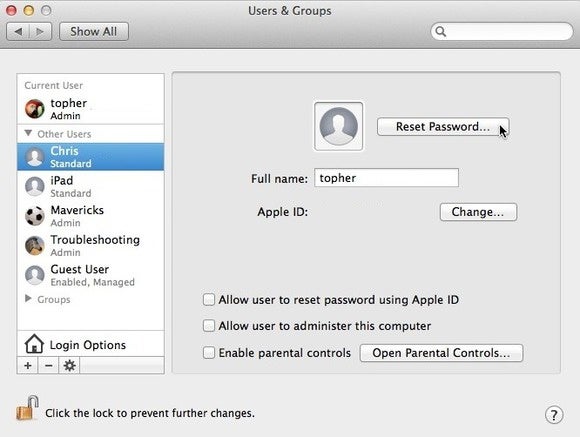
To maximize your Mac’s security you should have both an administrator account for administrative tasks and a standard account that you use for your primary identity (you can still perform administrative tasks from within your main account by authenticating with the administrator credentials). If you configure your Mac this way you can then log into the admin account and use the Users & Groups system preferences to change your main account’s password.
To do this, click the lock icon in the Users & Groups system preferences to authenticate, and then click the account you can’t log into. In the account’s settings, click the Reset Password button to change the account’s password.
Use Single-User mode
Every Mac has a main user account called “root,” which is the system account that’s used to launch the essential background services required for your Mac to operate. While this account is generally hidden and inaccessible, you can quickly get to it for its administrative capabilities by booting your Mac into single-user mode.
To proceed you’ll need to know the short name of the account for which you would like to reset the password, and then perform the following steps:
- Restart your Mac and hold down Command-S at the boot chimes.
- When you see the command prompt, enter the following command to put the boot drive into read and write mode:
mount -uw /- Now run the following command to load Open Directory (Apple’s account directory service in OS X):
launchctl load /System/Library/LaunchDaemons/com.apple.opendirectoryd.plist- Reset the password for your user account by entering the following command (replace “username” with the short name of the desired account)
passwd usernameUse an Apple ID
In OS X you can bind your user account to your Apple ID and then use it to reset your OS X password if you’ve lost it. This feature first requires that you’ve associated your Apple ID, which can be done by going to the Users & Groups system preferences, and then clicking the Set button next to the words Apple ID and then supplying your Apple ID and password. You can then enable the option to allow resetting your password using an Apple ID. (If you instead see a Change button next to the Apple ID entry, your ID is already associated.)
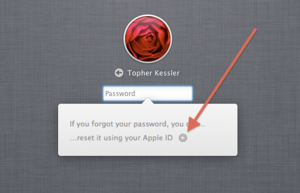
With this set up, you can reset your password by entering the incorrect password three times on the login screen, which will invoke a panel that prompts you to reset the account’s password using your Apple ID. Follow the on-screen instructions and you should be able to change your password and then log into your account.
Note that of the options I present here, this one should preserve the link to your keychain, allowing you to continue working seamlessly with your new password, without having to store other passwords in your keychain again.
Use Recovery Mode
A final option for resetting your password is to use Apple’s recovery tools. This will perhaps be the easiest approach in most cases, and can be done with the following procedure:
- Reboot into Recovery mode or Internet Recovery by holding Command-R at startup.
- Choose Terminal in the Utilities menu.
- Enter
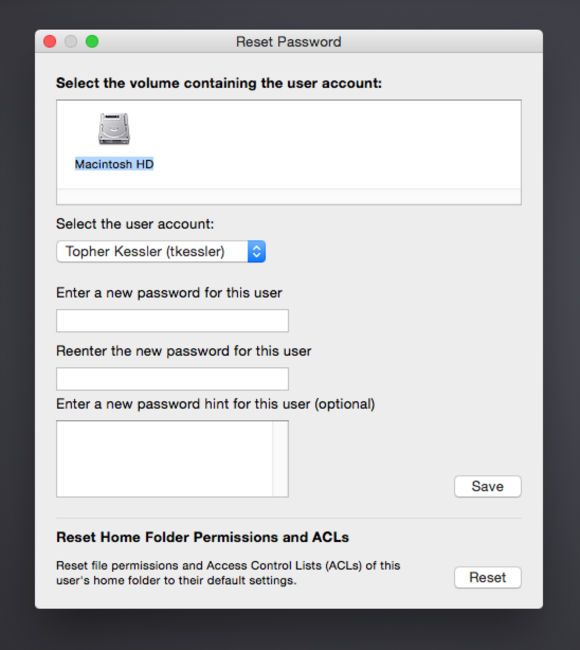
resetpassword(all one word, and lowercase) in the Terminal window and press Return. - Select your boot drive in the utility that appears.
- Choose your user account from the pop-up menu.
- Click the button to reset the account’s password and supply a new one when prompted.
If you use FileVault encryption with your Mac, the password reset utility will not show your boot drive until you first unlock it with Disk Utility. To do this, open Disk Utility where you will see your drive grayed out in the list of devices. Select it and click the Unlock toolbar button and then, after supplying your password to unlock the drive, you can select your disk in the password reset utility.
Recovering your data
The options I’ve mentioned will help you reset your password and log into your account. However, if you still can’t get into your Mac because of a lost or forgotten password there’s a way to get some of the data off of it. That way is Target Disk mode.
Target Disk mode lets you access your Mac’s hard drive as an external drive, provided that you don’t have FileVault enabled or a firmware password set on your Mac. If you do have FileVault enabled and can’t remember either your password for unlocking the drive or the drive’s recovery key, then you won’t be able to recover any data from it. In this case your best bet is to retrieve your data from a backup.
To use Target Disk mode, restart the Mac you wish to access and hold the “T” key when you hear the boot chimes. Connect this Mac to another one via either a FireWire or Thunderbolt cable and its hard drive should appear as an external drive to your second Mac. From here you can manually copy data from the drive or use Apple’s Migration Assistant or Setup Assistant tools to transfer your data.
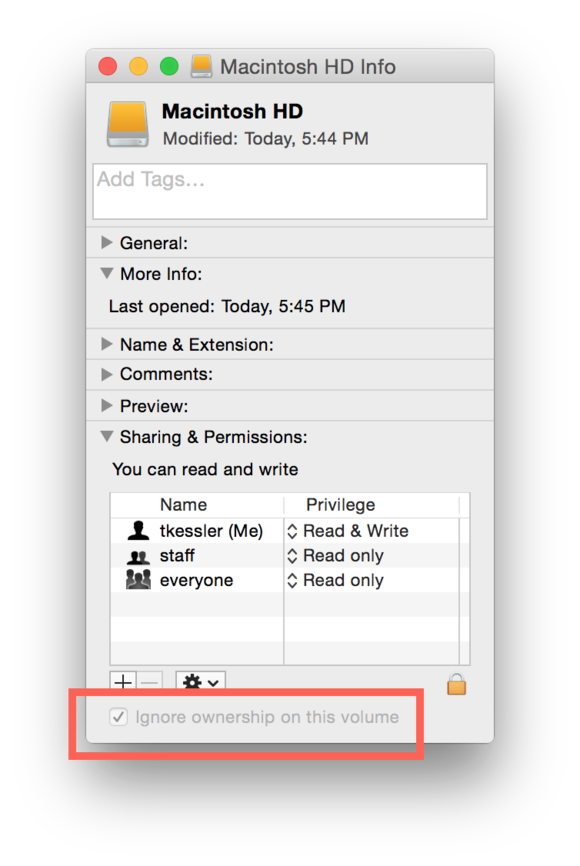
While you should be able to browse all files on the drive in Target Disk mode, there may be some times when you can’t do this, either because of permissions restrictions or because files are hidden. To overcome this, you can select the drive mounted via Target Disk mode, press Command-I to produce the drive’s Info window, and enable the option to ignore ownership on the volume (at the bottom of the information window). To manage hidden files, you can temporarily show all files in your current Mac’s Finder by running the following command in the OS X Terminal app:
defaults write com.apple.finder AppleShowAllFiles -bool TRUE; killall Finder
When you’re finished accessing these files, hide your files again by using this Terminal command:
defaults delete com.apple.finder AppleShowAllFiles; killall FinderA safe haven
Much as recovering or resetting a forgotten password may sound like a bother, its a small inconvenience that’s entirely trumped by a Mac protected with a solid password. Ideally you’ll never need to turn to these techniques. But should the bad thing happen, it’s nice to know you have so many fallbacks.
