

Think the Finder’s menu commands are simple and straightforward? Think again. Add to your desktop repertoire by using hidden commands. All you need to make them appear is the right magic key: Shift, Option, or Control.
1. Try wily ways to open folders and documents
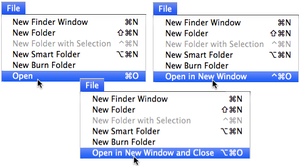
Want to open a folder? You’ve got options. Select a folder in a Finder window, open the File menu and press the Control key to change the Open command to Open in New Window. Not only do you get to keep the original window around for further work, but also the new window displays the folder’s contents the way you last left it—say, in a short-but-wide, Icon-view window in the lower right of the screen—instead of using the current window’s settings. If you prefer to use the keyboard, press Command as you double-click a folder to get the same effect.
When you want to open a folder the way you left it, but don’t want to be stuck with two open windows, use the Option key to change the Open command to Open in New Window and Close. The original window will close as the new one opens.
With a file selected, pressing the Option key changes the Open command to Open and Close Window. It sounds like a practical joke, but is merely practical, since it opens your document and closes its no-longer-needed window in the Finder. Another approach for this clean-as-you-go procedure is pressing Option when you double-click a folder or file.
2. Open files with the app you choose
A document usually knows what app created it, so when you double-click the file, that app opens. But what if you don’t have the parent application, or if the default program is one you’d rather not use? A JPEG image, for instance, can be opened by Apple’s Preview, Adobe Photoshop, or any Web browser. A text file might open in Microsoft Word, Apple’s TextEdit, or Bare Bones Software’s BBEdit. You can override the default by using the File > Open With command and choosing from the submenu. Or, Control-click (or right-click) on a file, and choose the Open Withcommand in the contextual menu that pops up.
To make the program you choose the new default when you open a particular document, press Option to change the contextual menu’s Open With command toAlways Open With. Forever afterward, that document will open in the app you chose from the contextual menu.
Bonus tip: Want to always open a certain type of file in a specific program? You might want, for instance, JPEGs to always open in Photoshop so you can edit them, instead of in Preview. Select any JPEG and choose File > Get Info. In the Info window’s Open With section, select an app from the drop-down menu, click the Change All button, and click Continue in the confirmation dialog box.
3. Go beyond the basic Info
You use File > Get Info on Finder items, right? It opens the Info window for the selected item, which provides all sorts of…well, info. You’ll find the basics of kind, size, and created and modified dates, and you can change things like the item’s icon or label color. But press Control, and the menu command changes to Get Summary Info. Press Option, and you get Show Inspector (or Hide Inspector if it’s showing). What’s the difference?
If you have only a single item selected, there’s no difference between Get Infoand Get Summary Info. But say you want to move several large files to a USB stick and you want to know if they’ll fit. There are other items in the folder, so checking the folder size won’t help.
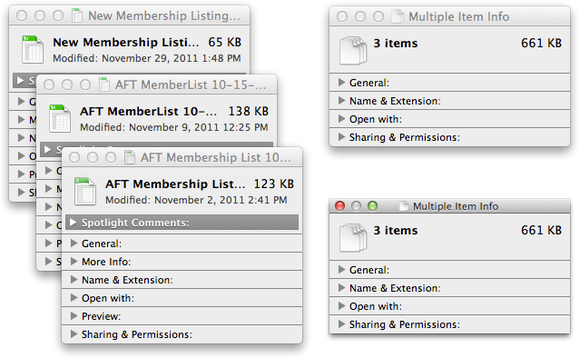
Instead, select all the files and use the Control key to reveal Get Summary Info. Select this, and you get a single window, titled Multiple Item Info, that summarizes the group selection, including the files’ total size. You can also use this window to set some options on all the selected items at once. For example, you can change their label color, lock or unlock them, set the Open With application, and even change their icons. (How do you change the icon? Click the icon in the top of the Info window of a file whose icon you like, and choose Edit > Copy. Select the icon in another file’s Info window, and choose Edit > Paste.)
The Finder’s Inspector window is a hidden gem. Select an item, or multiple items. Hold Option to change the File menu’s Open command to Show Inspector. The window that appears when you select this seems, at first glance, to be a duplicate of the Info window. But a closer look reveals that it has a different title bar—thin and squared off instead of the standard height with rounded corners. And, sure enough, it behaves like a palette rather than a window, remaining on top of all other Finder windows. But that’s a minor convenience.
Its real power is that it changes to reflect whatever selection you make in your Finder window. So, you don’t have to open and close individual Info windows to inspect file and folder information.
4. Move Finder items without dragging
Sure, you can copy and paste files and folders in the Finder with the Edit menu’s basic Copy and Paste commands (Command-C and Command-V, respectively) . But there’s another option—or should I say “Option”? Use the Option key to change the Finder’s Paste Item command to Move to Here. (Its keyboard shortcut, Command-Option-C, adds Option to the standard Copy shortcut.) This is much easier than dragging an item to a new location when the target window isn’t already open.
5. Get a new window for an enclosing folder
Your current window shows your folder’s contents, but you want to move up to see what else is in its parent folder. So you select Go > Enclosing Folder (or press Command-Up Arrow). But if what you really want to do is to peruse the enclosing folder without losing the current window, press the Control key to change the command to Enclosing Folder in New Window (or press Command-Control-Up Arrow).
6. Use global window commands
You can change or close all your Finder windows in one fell swoop just by adding the Option key. For example, select the Window menu and then hold down Option. The Minimize and Zoom commands change to Minimize All and Zoom All. Use the same trick to change File > Close Window command to Close All.
Bonus tip: Click on the red, yellow, or green button at the top of any Finder window while holding down Option to close, minimize, or zoom all open windows.
7. Leap to your Library
Say someone has explained that you can fix a wonky program by deleting its preferences files. Here’s a quick way to get to those files in your Library folder without drilling down through many folders: Select the Go menu and then press Option to see Library appear in the list of options.
8. Add an app to the Dock without dragging
On a big screen, you may have to drag a long way to move an icon into the Dock. Instead, select the icon, and press Shift to change the File menu’s ‘File > Add to Sidebar’ command to File > Add to Dock.
9. Deselect everything
When you’ve made one or more selections in a List view window that has no empty space at its bottom, it’s not easy to deselect everything. That is, not unless you use Option to change Edit > Select All (Command-A) to Edit > Deselect All(Command-Option-A).
10. Sort out your desktop
There are two basic organizational options for a Finder window: sorting, which puts things in order by name, size, kind, modified date, and so on, and arranging, which groups things according to certain aspects. You can use both options to, say, group things according to type—folders in one group, documents in another—and then sort items within those groups by something like creation date. The View menu provides only an Arrange By command, and you’re stuck sorting things by clicking on columns in List view windows—unless you press Option to change the command to Sort By.
Bonus tip: If you’ve put the Arrange button in your Finder window’s toolbar, press Option to change its menu to sorting choices; the name of the button doesn’t change, but its options do.
