

As more and more of our data moves to Apple’s iCloud and other server-based services, it’s hard to believe that just a few years ago we relied solely on iTunes to keep our devices up-to-date with our content libraries. Even though iTunes’ role in managing iOS devices has diminished, Apple hasn’t completely abandoned syncing. Here’s a guide to doing it right.
Do you need to use iTunes if you already use iCloud?
When you first sync your iPhone, iPod touch, or iPad with iTunes, you must physically connect it to your computer via USB. (After you’ve synced for the first time, you can also enable Wi-Fi sync, which lets you connect to iTunes via Wi-Fi only.) Depending on what categories you select to sync, you can then load music, movies, apps, TV shows, ringtones, podcasts, books, and photos onto your device from your Mac. These might be ebooks you’ve bought on Amazon or music you’ve ripped yourself, in addition to any iTunes-purchased content.
In contrast, iCloud syncs only content you’ve purchased from iTunes and apps and app data from the App Store. iCloud lets you re-download, over the air, your purchased music, movies, apps, TV shows, ringtones, podcasts, and books from the iTunes or App Store. (If you subscribe to iCloud’s $25 per year iTunes Matchservice, you’ll also be able to sync up to 25,000 songs you own but that aren’t on the iTunes Store.) All other content that you’ve purchased or ripped elsewhere won’t be synced via iCloud, nor can Apple’s cloud service sync with your iPhoto or Aperture library.
If you have no content on your computer that you want to keep on your iOS device, you may not need to use iTunes at all. The majority of folks, however, will likely want content from both iCloud and their computer, and in that case they’ll need to use iTunes.
What iTunes can do for you
Here’s how iTunes offers a real advantage:
It lets you keep full backups of your app data so that you can restore a device faster than you can via iCloud:If you plan to buy a new iOS device, you can restore your purchased apps and content via iCloud—but that process can be very slow. If you use your computer and iTunes, however, a full iOS device restore will take minutes, not hours.
You can make encrypted local backups of your device: Want to make sure no one can crack open your backups? iTunes offers an encrypted-backups option that protects your backups with a password. (iCloud also encrypts your backups, but you again have to access them from a server, rather than store them locally.)
You can easily rearrange your home screens and app layouts: Even in iOS 6 and Apple’s upcoming iOS 7, rearranging apps on new home screens can be a pain. iTunes offers a clickable rendition of your device’s home screen, where you can drag apps, create folders, and more, all with the click of a button.
You can add files to your apps: iTunes’ app file sharing lets you drag and copy files from your computer to specific apps on your iOS device; you can then view them on your iPhone or iPad. While Dropbox’s, Mail’s, and iOS’s respective ‘Open In’ commands make it relatively simple to add files to other apps on your iPhone or iPad, sometimes you might want to add a large file without sending it through Dropbox or Mail to add it to do so.
You can copy apps and their data: iCloud sync stores only your app’s data (game high scores, text files, saved passwords, and such) on its servers, not the apps themselves. When you need to restore your device, iCloud turns to the App Store to get the app. But if, for some reason, an app of yours gets removed from the iTunes Store, iCloud won’t be able to restore it.
If you sync your device with iTunes, however, all those apps and their data get copied to your computer for future restores, regardless of whether they’re still on the store. Granted, this takes up more space on your computer’s hard drive, but it ensures that an app you rely on won’t mysteriously vanish if you restore or upgrade your device.
How to add personal media to iTunes
If you want to enjoy your non-iTunes-purchased music, videos, books, or photos on your device, you must first make sure to import that content into iTunes on your computer.
To add an external media file to iTunes, simply drag it to the application’s Dock icon on your computer. Alternatively, with iTunes open, choose File > Add to Library and select the files.
When it comes to your photographs, iTunes sources images from either iPhoto, Aperture, a folder on your hard drive, or (for Windows users) Photoshop Elements 3 or later. To sync your images with your device, you’ll either need them to be in one of these programs or you’ll need to create a folder for them.
Not all media files play nice with iTunes: If you’re having a problem adding your content, check out our tips for troubleshooting music, video, ringtones, and ebook uploads.
Get ready to sync
Syncing your iPhone, iPod touch, or iPad with your computer is really quite easy. Gather your device and its USB charging cable, and make sure you have installed the latest version of iTunes on your Mac. Plug in your device, and iTunes should launch, displaying your device’s summary screen.
If iTunes doesn’t immediately display your device, click the Devices button in the upper right corner of the iTunes window. (If you’re syncing more than one iOS device with the same computer, you’ll instead see a button called X Devices, where X is the number of devices you have.) Alternatively, select your device from the iTunes sidebar. If the sidebar isn’t visible, choose View > Show Sidebar.
To find options for what you can sync and how you sync it, click the tabs at the top of the iTunes window.
See an overview with the Summary Screen
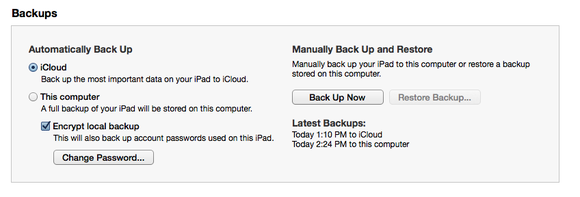
The summary screen offers a brief overview of your device, displaying its name, capacity, phone number (if applicable), serial number, and iOS version number. (Click the Summary tab if it isn’t displayed already.)
Here you can control how you back up your device. By default, iTunes asks you to choose one option (iCloud or your computer) for backing up. Still, if you choose to back up automatically via iCloud, you can always make an additional manual back up to iTunes by clicking the Back Up Now button you see here.
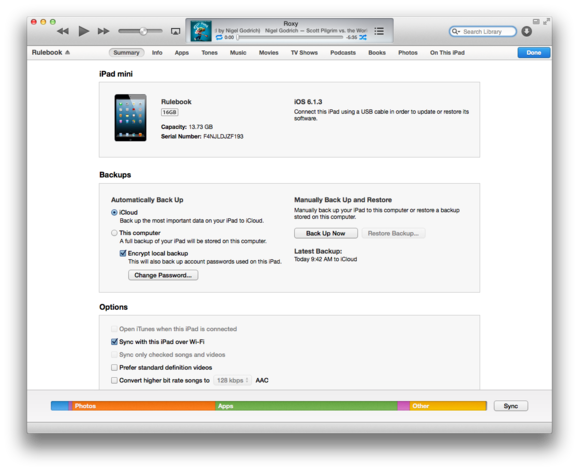
Other options include syncing only checked songs and videos, syncing SD video over HD video, converting high-bit-rate music to lower-quality (and smaller) files for your device, and specifying accessibility settings.
Additionally, if you’d like to use Wi-Fi Sync to connect your device wirelessly to iTunes in the future, click the ‘Sync with this [device type] over Wi-Fi’ checkbox.
Not much info to be had
The Info tab, at one point, was the main way to sync your contacts, calendars, and mail between your computer and your device. Now that most people have Google and iCloud accounts, however, this information usually syncs seamlessly over the air. If you’re using a service that won’t wirelessly sync with your device for whatever reason, you can manually sync it here, but most users should be able to ignore this pane entirely.
Wrangle your apps
Click the Apps tab to see syncing options for all your apps. By default, any you’ve downloaded directly to your device are copied to iTunes when you sync (or if you’ve turned on Automatic Downloads in iTunes > Preferences > Store). On this page, iTunes lets you pick and choose the apps you’d like to sync, as well as rearrange your home screens.
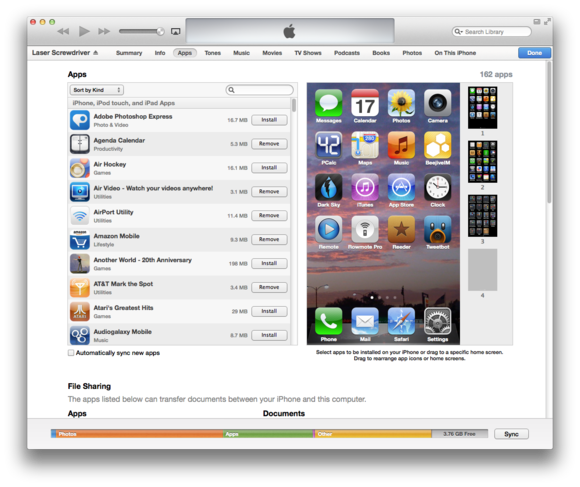
Make apps appear and disappear: A comprehensive list of all the apps you own shows up in a column on the left side of the pane; this includes iPhone-only apps, as well as iPad-only and Universal apps. You can sort these apps by name, kind, category, date, and size by using the pop-up menu above the list. To load an app onto your device, click the Install button to the right of the program’s icon; to remove the app, click the Remove button.
Below the list, you’ll see a checkbox that allows you to automatically sync any new apps you’ve purchased on your computer in the iTunes Store. (If you have Automatic Downloads enabled on your device, this checkbox is irrelevant, as any new purchases you make on your laptop or desktop will automatically download directly to your iPhone.)
Organize your home screens: On the right side of the Apps window is a preview of your device’s home screens. You’ll see a large, editable screen, as well as numbered thumbnails representing your other screens. Click a thumbnail to reveal it in the editing window. Here, you can click and drag an app’s icon to change its location. Or, if you see an app you’d like to remove, mouse over it and click the Xthat appears in the top left corner of the app icon.
Create folders: Still overwhelmed by your apps? Create folders to organize them. Drag one app onto another app; after a slight delay a folder appears with the two apps inside of it. The folder name is editable and you can rearrange icons within the folder.
Add files to some apps: Scroll down further on the Apps tab to access the File Sharing section. Some Apple and third-party apps allow you to add files from your computer via iTunes. (If you have no apps that support file sharing, this section won’t appear.) Click an app in the Apps list to see any files associated with it. To add a file, just drag it from your desktop or click the Add button.
Sync your music
Click the Music tab to see your options for tunes. To add nonpurchased music to your device, click the Sync Music checkbox. iTunes lets you choose between two options: copying your entire music library or copying selected playlists, artists, albums, and genres. You also have the option to include or exclude music videos and voice memos.
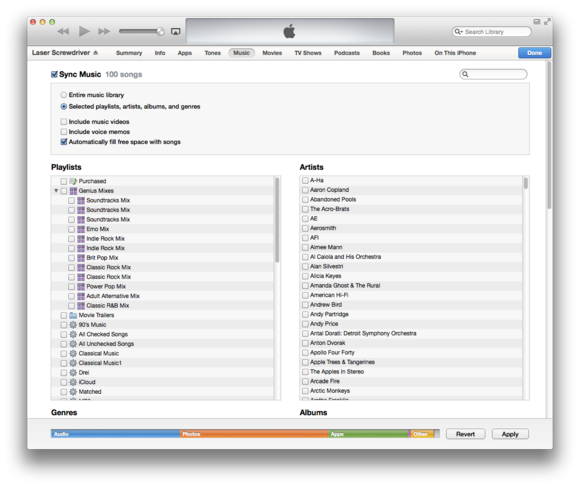
Check for space: If you’re wary of sticking your whole music library on your device, you can preemptively see how much space it will take by looking at the capacity bar at the bottom of the iTunes window. When you select the Entire music library option, iTunes estimates how much space the files will take up and adjusts the bar accordingly. You can also see how many songs you’ll be loading in the upper right corner of the pane.
Fill extra space with surprises: If you decide to pick and choose, iTunes loads a complete list of your music for your perusal. Under the ‘Include music videos’ and “Include voice memos’ options, choose whether you’d like to fill any remaining free space with randomly selected music. Mix and match artists, playlists, albums, and genres by selecting the appropriate checkboxes.
For iTunes Match customers only: If you use iCloud’s $25 per year iTunes Match service, you won’t be able to sync your computer’s music. That’s because iTunes Match takes over the Music app when enabled, allowing you to stream music from your digital library rather than storing it locally on your iPhone, iPod, or iPad. iTunes will let you sync any voice memos you’ve made, but nothing beyond that. If you want to sync and store music on your device, just go to Settings > Music on the device and disable iTunes Match. When you next plug in your device, you should have access to all music sync options.
Sync (ring)tones
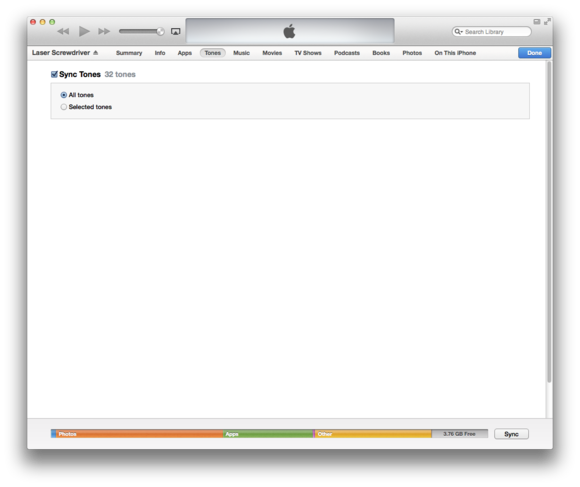
The Tones tab lets you sync ringtones you’ve created or purchased from the iTunes Store. (If you don’t have any, this pane won’t show up.) If you want to sync all your ringtones, select All Tones; otherwise, click Selected Tones.
Sync your movies
When you click the Movies tab, you see a list of all the movies you have loaded into iTunes, represented by name and a movie poster or selected screenshot. This might include the latest movie you downloaded from iTunes to watch on the plane, as well as projects of yours that you’re carrying around just in case you catch a movie producer in an elevator.
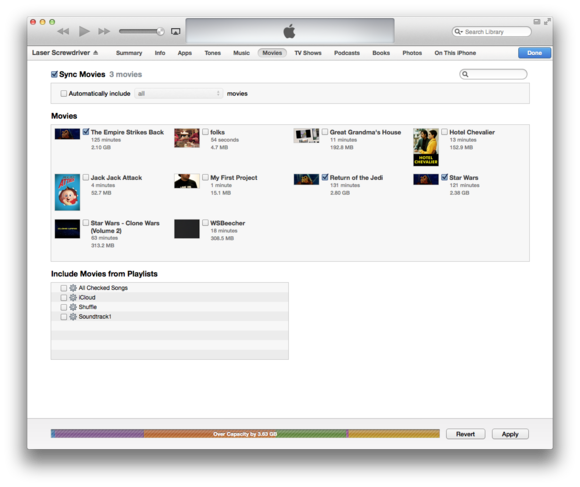
Click the Sync Movies checkbox, and you can automatically include all videos, selected videos, playlists, most recently uploaded videos, or unwatched videos. If you’ve rented movies from the iTunes Store on your computer, they appear at the very top of the screen. Transfer a movie to your iPhone or iPad by highlighting it, and then clicking the Move arrow. If you decide you don’t want to load the film on your device, click the arrow a second time.
Sync TV shows
As with the Movies tab, you see a list of your television shows, grouped by series, in the TV Shows tab.
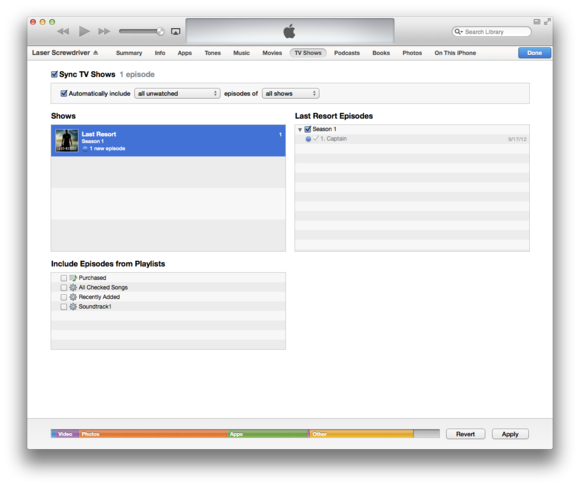
Click a show and, in the right column, you see a list of its episodes, organized by season. When syncing manually, you can choose only individual episodes or seasons of selected shows. You can also copy over playlists that include TV episodes. If you choose to sync automatically, however, you can copy over an entire series (or your entire television library). You can also filter within that series to sync only unwatched or newly added episodes.
If you’ve rented TV shows on your computer from the iTunes Store, they appear at the very top of the TV Shows tab. Transfer one to your iPhone or iPad by clicking the Move arrow. You can remove it from your device by clicking the arrow a second time.
Sync your podcasts
The Podcasts pane presents you with a list of all your subscribed podcasts, grouped by series. (If you haven’t subscribed to any, this pane won’t show up for you.) That said, this is one case when iTunes syncing may not be necessary. If you already have the Podcasts app on your iPhone or iPad, that will probably suffice.
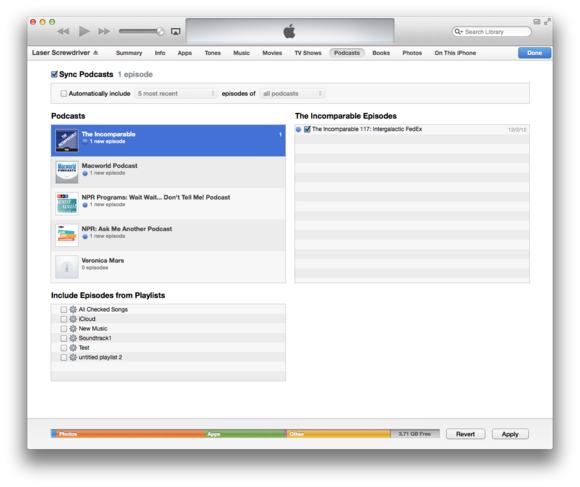
Clicking a podcast displays a list of the show’s episodes, organized by date in ascending order. You can choose to sync your podcasts manually or use iTunes’ automatic options, which offer syncing for the most recently uploaded or unplayed episodes for selected shows or all shows.
Sync books, PDFs, and audiobooks
The Books pane divides books and Audiobooks into two sections. Choose to syncAll books or Selected books. You can peruse a list of your ePubs and PDFs if you want to pick and choose. The Sync Audiobooks pane is organized much the same way.

Sync photos and personal video
Unlike your other content, your photos and personal video files are only linked to iTunes, rather than stored there. (Your original files remain in Apple’s iPhoto, Aperture, or the image folder you’re syncing with.)
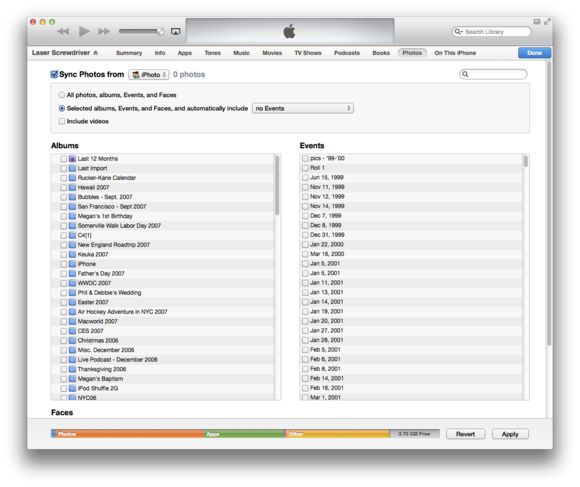
To sync photos, go to the Photos pane and choose the application or folder iTunes should link from. For example, if you keep all your images in iPhoto, enable theSync Photos from option and choose iPhoto in the pop-up menu.
You can sync images according to how they are organized in that application. For example, if you use iPhoto, you’ll see images organized by date. Otherwise you can select only your Pictures folder or a custom folder of your choice.
Unfortunately, you can’t sync your iPhone or iPad with more than one program or with multiple folders. You have to choose one. As with all the other media panes, you can sync your entire photo library to your device or choose selected albums, projects, and (in iPhoto’s or Aperture’s case) Events, Faces, or images with certain star ratings.
