Apple’s music division has been anything but idle the past several years, but it has focused largely on the GarageBand products for consumers and mobile users. The professional crowd has seen some updates (and a reduced price) to 2009’s Logic Pro 9, but very little else. Today that changes with the release of Logic Pro X, Logic Remote, and MainStage 3.
Those who’ve seen the Roman numeral X slapped onto Final Cut Pro may approach this release with some initial trepidation. Has Logic Pro been stripped of vital features to make it more accessible to GarageBand users? Is Apple abandoning professional audio engineers and musicians to cater to the prosumer user?
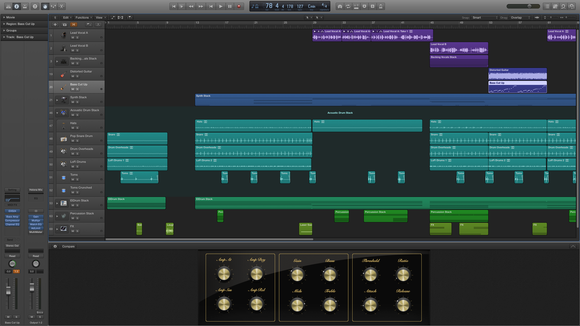
No and no. While Logic Pro has indeed adopted some of the look of Final Cut Pro X—with its dark visage and panes that can be invoked or dismissed as the mood strikes—Apple’s digital audio workstation (DAW) has lost none of its power and gained valuable features on just about every front.
What’s required
Logic Pro X is available only through the Mac App Store and costs £139.99. This is for both new and existing users of Logic—no upgrade pricing applies. Your Mac must be running OS X 10.8.4 or later, and you’ll want at least 35GB of storage if you plan to install all of the optional content (you can get by with 5GB for the default Logic Pro X installation). You should also make sure that any plug-ins you wish to use are 64-bit: With this version of Logic Pro, Apple has bid farewell to 32-bit plug-ins. There’s no bridging utility to allow those older plug-ins to work, so they are entirely incompatible with the application. But the new version hasn’t entirely abandoned the past. Projects created as far back as Logic 5 can be opened with Logic Pro X.
An interface with ease in mind
Logic has long had the reputation of being one of the deepest, but most challenging DAWs to use. Since Apple acquired Emagic (the German company that developed it), it’s set about making Logic easier to use. Logic Pro X takes a major leap in that direction.
Apple has rethought the placement of elements you routinely use. For instance, the transport controls have moved to the top of the window to join the buttons that represent common commands, whereas in the past these controls and buttons were split between the top and bottom of the interface. The Library pane is now on the left, as many of us tend to work from left to right, and can quickly be exposed or hidden with the click of a button. As in GarageBand, each track now has volume and pan controls within the track list, thus allowing you to make changes there rather than moving to the Channel Strip or Mixer. Overall, elements are slightly bigger than they were in Logic Pro 9, so that finding just the tool you want is easier.
This doesn’t mean that Logic Pro has lost its command-rich menus within the application’s various panes. When you need to dig deep, they and the menu bar menus are still your avenue for doing so. But when you want to do something quickly—sketch out a new tune or perform a quick edit—the new layout makes it easier to get to the task at hand.
It also presents GarageBand users with a more familiar environment. Musicians who’ve grown beyond GarageBand’s capabilities often come to Logic and sit, stupefied, wondering where to begin. I have little doubt that part of the purpose behind Logic Pro’s redesign was to make these users feel more welcome. Close enough panes, and you find a Logic Pro that performs a darned fine imitation of the GarageBand interface. As those users become more confident with the application, it’s a simple matter to expand the interface to place more advanced tools before them.
Other adjustments make Logic more logical. Elements in a channel strip and mixer—a group of effects, for example—reflect their position in the signal path. To change their position in that path, just drag them up or down to a new position. And you can now engage a Quick Help feature that, in a small window, provides tidbits of information about any item your cursor hovers over. You can easily move arrangement markers to change the order of sections in your song. The Score editor now behaves more like a notation application. And the arpeggiator, plucked from its obscure location, is now within the software instrument tracks’ Edit pane.
An interface concerned with clutter
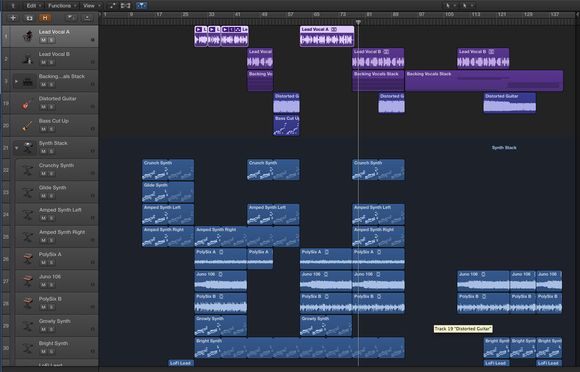
Logic Pro’s interface changes are about more than accommodating GarageBand users—in the past, pros could be overwhelmed as well. For example, suppose you’re working on a project that contains half-a-hundred tracks. Regardless of how large your monitor is, you’re going to perform a fair measure of scrolling as you access your tracks. But suppose you could group some of those tracks—all the acoustic drum tracks, for example—into a folder-like arrangement in the track list and then show or hide the tracks it contains with the click of a triangle icon? That’s one of the ideas behind the new Track Stacks feature—specifically, the folder stack. In this view, you consolidate tracks you’ve selected into a single group (thus getting them out of the way). Once you’ve created the folder stack, you can mute and solo the stack as well as control its volume with a single fader.
The other idea is the summing stack. Again, you consolidate the selected tracks, but in this case you’re submixing them into an auxiliary channel.
If this track contains software instruments, it can be used and saved as a patchso that it behaves like a single instrument rather than a group of instruments. For example, you’ve created seven tracks, all of which are analog synthesizer tracks, with Logic’s instruments. Not only can you group and hide them as well as control their mute, solo, and volume settings, but you can additionally use your MIDI keyboard to play all of them at once as a single instrument. And if you’ve configured the ranges for each track—so the Growly Synth plays only the first two octaves, the Crunch Synth plays every note thrown at it, and the Lead Synth plays just the top two octaves—different instruments play, depending on which key you press. Press a low key, and you hear the Growly Synth and Crunch Synth mixed. Play something in the top octaves, and you hear no Crunch Synth, as it’s not mapped to play in this range. You can then save this patch and call it up for any project you work with in the future. This is a powerful method for creating layered (and fat) instruments.
Another way Apple makes Logic more accessible is through new Smart Controls. If, in the past, you created a software instrument track or applied an effect to a track and wanted to change some of that track’s parameters—give a little more brightness to an instrument or adjust a compressor effect’s setting—you were thrown into what could be a complicated interface with scads of controls. Smart Controls allow you to avoid this by providing a subset of simple controls for accessing that instrument's or recording’s most common settings.
For example, call up the Classic Electric Piano instrument, double-click on its icon in the track list, and its Smart Controls appear at the bottom of the Logic window. Here are eight simple knobs for exactly the kind of tweaks you’d want to perform on a Fender Rhodes electric piano—Bell, Drive, Treble, Bass, Tremolo, Ambience, Chorus, and Reverb. No sampler fiddling required.
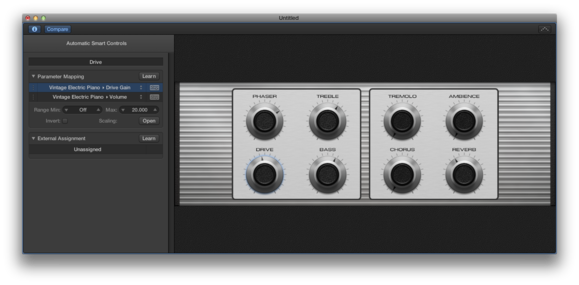
You don't have to live with a track’s Smart Controls, however. Click an Info button, and a pane appears where you can choose what a particular control will do. For instance, on my Fender Rhodes I can assign a Phaser control to what is, by default, the Bell control knob. I can then store those settings as part of a patch so that they come up every time I use it. And like other Logic controls you can assign a hardware controller to them (a slider or wheel on your MIDI keyboard, for example) and manipulate them while you play. As you do that, you can record your manipulation so that it plays back with the track.
Give the drummer some props
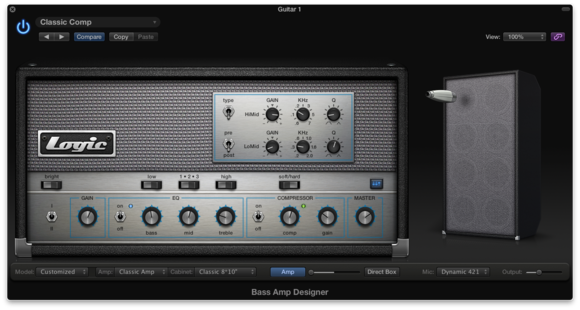
Logic Pro 9 was a boon for guitar players in that it included stompbox, amp, and speaker effects. With Logic Pro X, Apple turns to bass players and drummers. Bass players will be happy to know that they can now build their own rigs as well. Included are three amp models—Modern Amp, Classic Amp, and Flip-Top Amp—as well as a Direct Box setting. You can additionally choose from six cabinet settings—Modern Cabinet 15”, Modern Cabinet 10”, Modern Cabinet 6”, Modern Cabinet Distant, Classic Cabinet 8*10”, and Flip Top Cabinet 1*15”. There are two direct box-out settings as well. And, as with the guitar rig, you can choose a mic and its position—a Condenser 87, Dynamic 20, or Dynamic 421. While bass tracks are designed primarily for those jacking a real bass into an audio interface, as with guitar effects, you can apply your bass rig to software instruments and MIDI tracks too.
New drum features run deeper still. I’ll start with the new Drummer track. Drum loops can help you sketch out a tune, but because they’re loops, they tend to be pretty static. You can tweak them and insert fills but they still don’t sound like the real thing.
So Apple came up with the Drummer track. These are 15 virtual drummers—sampled from some of the world’s best studio cats—who live inside Logic. Create one of these tracks and choose from four styles—Rock, Alternative, Songwriter, or R&B (sorry, no Country, Jazz, or Latin). Then choose the drummer you’d like to use (and yes, they all have names). For example, Max is a punk drummer who bangs on a punchy kit. Logan is an older dude who prefers retro rock and plays a just-as-retro kit.
This may sound like just a cute way to add personality to loops, but it’s far more than that. Next to your drummer are some helpful controls. From a Presets menu you can choose a substyle in that drummer’s roundhouse. For example, with Logan I can choose AM Gold, Stonehenge, or Firebird (licensing issues may prevent Apple from calling it “Freebird”). Next, you can employ an X-Y pad and move a controller between Simple and Complex on one axis and Soft and Loud on the other. Drag the control around, and the pattern changes to match your desires. For example, if you place the control in the bottom left corner (Simple and Soft), you may hear a rudimentary kick drum on beats one and three and high-hat clicks on beats one through four. Drag the control to the top right corner (the Complex and Loud corner of the X-Y controller), and the pattern gets far more interesting.


