

It seems like every time a major software revision comes along, it’s described as the “biggest ever.” In the case of iOS 5, though, that might not be hyperbole—there’s hardly a part of Apple’s mobile operating system that isn’t altered in some way by the latest update.
Don’t think that this is just change for change’s sake, however. By and large, iOS 5’s changes are for the better, spackling a number of shortcomings and gaps in functionality that have existed since day one.
Tempting as it may be to dub iOS 5 the “Snow Leopard” of iOS, though, it’s clear there’s a lot more to this than simply filling gaps. iOS 5 marks the first major revision of iOS to be simultaneously released for the iPhone, iPod touch, and iPad. It also finally brings feature parity between the CDMA (Verizon) and GSM (AT&T) versions of the iPhone. In fact, all of Apple’s iOS devices are on the same page now (with the exception of the few specific features—such as Siri voice-control—that are limited to theiPhone 4S).
And that page isn’t exactly what you think it is, either. With iOS 5, Apple’s theory of the post-PC era finally moves into practice. No longer are iOS devices second-class citizens, tethered to the sinking anchor of a personal computer. With iOS 5, it’s possible, for the first time, to use your iPhone, iPod touch, or iPad as your one and only device.
PC Free, with every purchase
Despite touting the PC-free capability on its list of features at this year’s Worldwide Developers Conference, the ability to use your iOS device sans PC isn’t really one feature, but a collection of them. That said, it represents perhaps the most important shift ever in thinking about Apple’s non-PC devices.
Going back to the original iPod, Apple’s non-PC devices have been viewed as accessories. You bought an iPod to go with your computer. Your iPhone synced data with your computer. Your Apple TV streamed content from your computer. By the time Apple released the iPad, that concept was straining at the seams. After all, what is the iPad if not a computing device in its own right? Why does it need to be subservient to a Mac or PC?
As of iOS 5, your iPhone, iPod touch, or iPad can stand in the place where it lives, with no need for a Mac or PC to prop it up. The importance of this change is impossible to ignore. A year and a half ago, I argued that the iPad heralded a third revolution, but where that was a warning shot—a promise of things to come—iOS 5 finally delivers on that promise.

Welcome to the Party, Pal: Instead of the old 'connect to iTunes' screen, you'll now get a nice setup walkthrough.
Setup man: The setup of a new device is perhaps where the distinction is most apparent. Whereas previous iOS devices would welcome you with the all-too-familiar instruction to plug them into a computer running iTunes, iOS devices now display a friendly welcome message—much like when you set up a new Mac.
If you’re starting with a fresh device, iOS 5 will walk you through a series of steps to get it set it up. You’ll be asked if you want to enable location services, prompted to choose a Wi-Fi network, then given the option to restore from an iCloud or iTunes backup or to set up a brand new phone (or iPad, or what have you). If you set it up as a new device, you’ll be asked to enter your Apple ID (or create a new one), then given the Terms and Conditions for iOS, iCloud, and Game Center, as well as Apple’s Privacy Policy; if you agree to those, you have the option to activate iCloud, iCloud Backup, and Find My iPhone. As a last step, you’re given the option to allow the device to send diagnostics and usage data back to Apple—you can also opt out or, if you do choose to enable it, turn the feature off later under Settings -> General -> About -> Diagnostics & Usage. This information can help Apple improve its products, but the company also warns that it may include some location data.

Finders Keepers: New users will be asked if they want to activate Find My iPhone when they set up their device.
It’s a pretty straightforward process, and one that even a technological neophyte shouldn’t have too much trouble with. Apple provides help links for most screens, explaining what a given technology is and why a person might want to use it. Much kudos in particular to the company for making Find My iPhone a part of every iOS device setup process. Having known a number of people who have lost their devices, or had them pilfered by nefarious wrongdoers, this is a feature that can genuinely help people—if they set it up. And now, thanks to iCloud, it’s available to all iOS device users for free.
Mind the Gap: Apple has also taken this opportunity to fill in numerous gaps in functionality that used to send one scurrying for their computer. For example, you can now add photo albums on the iPhone. You can create playlists. You can delete songs from your Music library (though, woe still betide you if you want to add anything to that library without going through Apple’s prescribed methods). And, joy of joys, you can now update an iOS device’s software right from the device itself, over the air—a capability that has been deployed by many of Apple’s competitors in a decidedly hit-or-miss fashion.
Other places where Apple is shucking the bonds of the PC include backups. In the past, iOS devices have backed themselves up while syncing with iTunes—and while you can still opt to keep things that way, either via cable or the new Wi-Fi Syncing (see below), those who choose to eschew a computer can back up their device online, via iCloud.

Call for Backup: You can now back up your device to iCloud instead of to iTunes.
To reduce the amount of space needed—each iCloud account comes with a free 5GB, and the smallest iOS device Apple sells is 8GB—only your data is backed up. And not even all of your data: Any media you’ve downloaded from the iTunes Store doesn’t count against your total, and that includes apps as well as music, video, and books. You can also selectively choose which apps’ information you want to back up in Settings -> iCloud -> Storage & Backup -> Manage Storage (or Settings -> General -> Usage -> Manage Storage).
Like Wi-Fi Syncing, backups happen when your device is on a Wi-Fi network and plugged in, so if you let your iPhone or iPad charge over night, it should be all set when you pick it up in the morning.
You can also manage your device’s internal storage. Settings -> General -> Usage provides a list of all installed apps—although many of the apps that ship on the phone are not present—and their size; tap on any to see the size of any documents or data that are being stored in that app. (Often, those file sizes are far smaller than the app itself.) There’s a Delete App option available on most of the screens as well.
Gimme an Update: Software updates for iOS are now available via the Settings app.
iOS software updates are another task that used to require running to a computer; now that’s built in as well. It’s available under Settings -> General -> Software Update though, as you might expect, we’ve been unable to test it in the final version of the software so far.
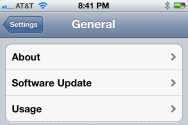
Finally, should you decide the name of your iOS device isn’t quite cutting it, you don’t have to turn to a computer to change it. Just navigate to Settings -> General -> About and tap on the Name field to enter a new one.
Notify this
By now, the pattern in Apple’s major iOS updates ought to be pretty clear. Every significant version change has brought at least one very important systemwide update that addresses a shortcoming, along with a handful of feature enhancements and other tweaks. In version 2.0, that was the App Store; in 3.0, it was cut, copy, and paste functionality; in iOS 4, we finally got multitasking. In iOS 5, that role is played by improved notifications.
It wasn’t long after push notifications were finally introduced in iOS 3 that frustrations began popping up right alongside them. The blue alert dialog that appears to let you know you’ve got a new text message or update you on your sports scores is handy and all, but it can induce plenty of annoyance when you’re in the middle of doing something else. Plus, if you dismiss the notification just to get it out of the way, there’s no way to get back to it later.
iOS 5 improves notifications in three key ways: the introduction of banner notifications, the addition of Notification Center, and improvements to lock-screen notifications.
Banner notifications solve the problem of having notifications interrupt everything you’re doing. Instead of appearing as a dialog box, the top of the screen flips down—like one of those rotating billboards—to reveal a small icon from the notifying app and a message. Tapping on the banner takes you to the app in question; but if you don’t tap the notification, it will linger for a few seconds and then disappear again.

Center for Notification Control: Incoming alerts and messages now get collected in Notification Center, accessible by swiping down from the menu bar.
But what if you don’t quite tap fast enough? No worries—that’s where Notification Center comes in. Just swipe down from the menu bar and you’ll drag down a sheet containing all of your recent notifications, arranged by the originating app. As with the banner notifications, tapping anything in Notification Center will take you to that app (and usually to the relevant item).
You can clear all the notifications for any app by tapping the ‘x’ icon opposite its name, then tapping the Clear button that appears. However, there’s no way to clear just a single notification without tapping on it—my experience with iOS’s multitouch conventions tells me I should be able to swipe across a notification and have a Delete button appear, but sadly that doesn’t appear to be the case; it’s an all-or-nothing proposition.
Notification Center gives you two choices for organizing the order in which apps appear in it: manually or by time. If you choose by time, the app with the most recent notification will show up at the top, followed by the app with the second most recent, and so on. If you opt for manual organization, then the apps will appear in the same order that they do in Settings -> Notifications. You can reorder them there by tapping the Edit button and dragging them into your desired sequence.
In addition to notifications, Notification Center on the iPhone includes two special entries: a Weather widget and a Stocks widget. The Weather widget displays the current conditions and temperatures for the first location in the iPhone’s Weather app (if you enable the Weather app’s new Local Weather option, that’s what will show up in Notification Center). Tap on the widget and you’ll be taken to the Weather app.

Take Stock: The Stocks widget in notification center lets you keep an eye on your investments.
The Stocks widget shows a scrolling ticker of any symbols you’ve added in the Stocks app, along with their current quote, whether they’ve gone up or down, and—for companies—their current market capitalization. You can tap and drag on the scrolling stocks, just in case the one you wanted to look at scrolled by too fast. And tapping on the widget will take you to the Stocks app.
Like the other apps in Notification Center, you can place the widgets wherever you like, if you’ve chosen to organize them manually. (If you organize by time, they’ll always be at the top.) However, you can’t configure anything else about them, other than turning them off or on.
While I turned the Stocks widget off—I don’t need constant reminders of our economic woes—I find the Weather widget extremely handy. I hope that Apple will extend this widget space to further apps and perhaps even third-party developers at some point in the future; I can imagine plenty of apps where I’d want the option to get a quick glance at their status without launching them—a news reader for example, or social networking client, or an app that provides sport scores. Or, for that matter, let third-party makers of weather and stocks apps provide their own widgets, if users would prefer them.

Lock Down: Your lock screen will now show you a list of all notifications you've received while the device has been sleeping.
The last part of the notifications overhaul in iOS 5 is the improvement to the lock screen. In previous versions of iOS, if you got multiple notifications while your phone was asleep, they would appear in a blue dialog box along with a brief description: two missed calls, a voicemail, a text, etc. But once you unlocked the phone, those messages would disappear, so it was incumbent on you to remember what they were.
Now, your lock screen gives you a scrollable list of all your notifications, listed in the order that you received them. As with Notification Center and banners, an icon tells you what app the notification is for, along with a short description of the alert. Swiping any icon will unlock the phone and take you right to that application.
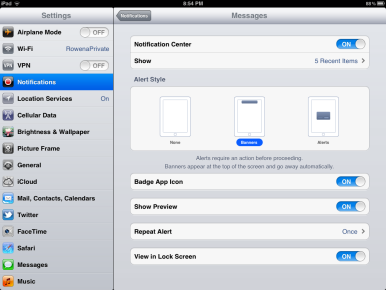
Apple has also added granular controls for notifications along with all these new options. In addition to now being able to enable or disable sounds, badges, and alerts, as you could previously, you can now also choose whether an app’s notifications show up in Notification Center or on your lock screen. You can also choose to retain the alert-style notification on a per-app basis, if you prefer, and dictate how many recent notifications appear in Notification Center for the app: one, five, or ten. (The iPad also offers the ability to have 20 notifications displayed for an app.)
App by App: You can specify notification settings on a per-app basis.
However, there are some downsides. For example, there’s no longer a way to quickly disable all notifications, as in iOS 4. Now, you’ll have to go through and disable all the various options for each app one at a time.
In particular, Calendar’s entries in Notification Center can be sub-optimal. Like any of the other apps, you can choose to have one, five, or ten of your Calendar events displayed. Obviously, Notification Center simply picks the next upcoming events, but it would be nice if there were some more specific controls in place. As someone with a lot of work and personal calendars to juggle, I find that Notification Center fills up with calendar events that I don’t really care about, while events that are more important to me get lost in the shuffle. The ability to have Calendar notifications pick from a specific calendar, or ignore certain calendars, would really improve the usefulness of Calendar in Notification Center.
One nice touch, though, is that if you have a reminder or calendar event that’s keyed to a particular time, the time remaining until it (or after it) will continue to update on the lock screen.
iMessage, you message, we all message!

Message for You, Sir: iMessage sends all your messages over the device's data connection, saving you money.
When Apple first released the iPhone, there was a lot of speculation about why the company didn’t include an instant-messaging app. After all, it includes its own IM client, iChat, on the Mac. The prevailing opinion seemed to be that including an IM app would have detracted from one of the wireless carriers’ cash cows: text messaging.
With iOS 5, Apple has evidently decided that its position is no longer as tenuous as it was back in 2007. In this update, the company has introduced a system called iMessage, which lets you freely send messages—text, image, video, a location, or contact information—to anybody else on an iOS device, free of charge. That’s because iMessage sends its payload over the device’s data connection (Wi-Fi or 3G) instead of over the control channel of the cell phone’s voice connection, as SMS does. And because you’re already paying for a data plan, those bits and bytes will only count against your cap for that, rather than against your SMS limit.
In essence, that makes messaging virtually free—as long as you’re conversing with a fellow iOS device owner.
What’s clever about how Apple implemented iMessage is that it built the feature right into the existing Messages app. So there’s no having to explain to your less technically savvy friends how they can send you a free message instead of an SMS; it’s all done automatically.
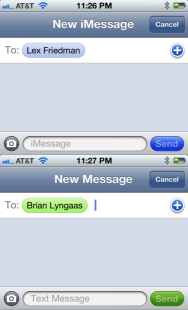
Right on Cue: If it's light blue, sending an iMessage are you; but if it's green, you're a texting machine.
In its traditional attention to design, Apple uses subtle cues to differentiate between sending an iMessage and a standard text message. When you add a contact whose phone number and/or email address are associated with iMessage, their contact bubble and the Send button will appear in blue; if you’re just sending a plain old text message, they’ll be green instead.
Any phone running iOS 5 which also has iMessage enabled (Settings -> Messages) will automatically have its phone number associated, much in the same way as FaceTime. In addition, also as with FaceTime, you can add other email addresses where iMessages can reach you.
However, while you can send a message to multiple iMessage recipients or text message recipients, trying to mix and match ends up falling back on the lowest common denominator. So, if you send to multiple phone numbers, and even one of them isn’t associated with iMessage, you’ll end up sending SMS messages to all of them. If you include an email address among your group, that contact will get an email message instead.
There are a few other nice additions to iMessage, besides the whole “replacing SMS” aspect. For one thing, because this is a smarter, more modern system than text messages, it can add features like the ability to tell you when a contact has received and even read a message. (If you’re squeamish about having others know just when you read their messages, you can deactivate that option in Settings -> Messages.) As in iChat on the Mac, you’ll also get a little word bubble with an ellipsis in it while the other person is composing their message.
Overall, iMessage is probably not something the wireless carriers are thrilled about, but it’s hardly a new idea. RIM has been doing a similar thing with BlackBerry Messaging (BBM), and Android users can get similar functionality with Google Voice, Google+’s Huddle features, or third-party apps—some of which are available on the iPhone, too.
iMessage is not quite a replacement for instant messaging or text messages, but the fact that Apple has combined the two into one app, rather than creating an iMessage app that’s completely separate, is a smart move, and one that may hasten the demise of SMS.
While this all may be a poke in the eye to carriers like AT&T and Verizon, it also encourages messaging fragmentation by raising the old standards problem. When all your friends have different smartphones, will we still be reliant on SMS and MMS to send our messages? Or will we have to rely on email or a third-party solution? Or, hope against hope, can all these various manufacturers and software developers find a way to live together in harmony?
By the way, I wouldn’t bet on that last one.
Remind me
The announcement that Apple would, at long last, add a to-do style app to its iOS raised concerns from some that Cupertino was pulling a Sherlock on a field dominated, to date, by third-party app makers. But given the application’s extremely bare-bones and inconsistent nature, I think those developers have little to worry about.

Makin' a List: You can create a list of any sort of item or task.
Reminders seems straightforward enough: Create a task you need to do, specify how you’d like to be reminded, and you’re done. Surprisingly, though, Reminders ends up being perplexing, with a superfluous feature or two, an occasionally strange interface, and a general impression that every time you launch the app it’s muttering “Who am I? What am I doing here?”
Take, for example, the option to add a priority to tasks. While you can add a ranking of Low, Medium, or High to a task (in addition to the default None), doing so appears to have no effect whatsoever on the item in question. It’s not reflected in the list of tasks or the order of the tasks, and you can’t filter for priority at all; that priority does, however, show up in the Calendar Web app for iCloud, as well as in iCal on your Mac if you sync your reminders via Apple’s rechristened Web-based service. So why not on your iOS devices?

No Matter Where You Go, There You Are: Reminders can send you an alert when arrive at or leave a location.
Much of Reminders seems to be built around two ideas: First, filling that longstanding gap for syncing tasks from iCal to your iPhone; and second, location-based reminders. This latter feature is a clever one, even if Apple’s not the first to roll it out. Basically, the idea is that if you want to reminded to do something at a particular place—say, remembering to buy stamps while you’re at the post office—you can input that location and, when you arrive there (or depart the scene), your iPhone will display a notification.
Sounds great, in theory, and it works—albeit it with some caveats. The biggest, in my opinion, is an inability to specify a location that’s not associated with a contact (or that’s not your current location). So if, in the aforementioned example, you want to remind yourself to buy stamps at your local post office, you have to add a contact for that post office. It’s clumsy and bizarre, especially given the far superior interface that iOS’s Maps app uses for a similar process.
You also can’t manually reorganize items in a list—nor do they change position based on the time you set for the alerts; they’re always in the same order that you add them.
All in all, Reminders may be sufficient for the most basic task-tracking, but anyone who seriously relies on managing their to-dos will probably want to turn to a third-party solution for now.
Now tweet this

Free as a Bird: You can set up multiple Twitter accounts in the new Settings section, and even install the official client.
Speaking of third-party software, it might seem at first blush that Apple’s aiming at the horde of Twitter clients by bringing built-in integration with the social-networking service to iOS 5. But relax: it’s not going to do away with your Twitter client. In fact, iOS 5’s Twitter integration provides a nice complement to the Twitter client of your choice, as a glass of wine to well-prepared meal.
To configure your Twitter account, you just visit the new Twitter section of Settings, and enter your login credentials; you can set up multiple accounts, if you so need. In a tie-in with Twitter itself, you can also install the company’s own iOS client directly from settings by tapping an Install button.
For the most part, iOS 5’s use of Twitter is relegated to posting. For example, you can upload a photo from Camera or Photos, along with a short message, by tapping the Share icon and then the Tweet button. In Safari and YouTube, you can tweet links; in Maps you can share a location via Twitter. Apple’s even provided a Twitter-friendly version of iOS’s software keyboard, making commonly-used Twitter symbols like @ and # easy to access.
Every time you compose a tweet, you can specify whether or not you want to add location data to it. However, Apple’s realized that many of us aren’t keen on sharing exactly where we are right now to our social networking information, so the information is only general. For example, posting a tweet from my house with location data only reveals that I’m in my hometown of Somerville, MA, as opposed to my address or exact coordinates. You’ll also need to enable location information in your profile on Twitter’s website first, or the location data won’t be attached.

A Picture Is Worth 40 Characters: You can quickly tweet images from the Photos or Camera apps.
Apple’s also tried to provide more fine-grained controls on what Twitter can and can’t have access to. For example, you can disable Twitter access for any app—it won’t make the Tweet button go away, but if you tap that button, a dialog box will pop up, informing you that it’s not available.
In addition, under each Twitter account, you’ll find a slider labeled Tweet Location, under which, Apple helpfully writes, “You can include your approximate location on individual tweets.” Sounds all well and good, but in my testing, this slider does absolutely nothing. Regardless of whether it’s on or off, no location is automatically added to my tweet, and in either case, I can still manually associate a location with my tweet by tapping the Add Location button.
However, there’s an exception to that—Maps. If I tap share location, my current location is appended to the tweet, along with a Google Maps link to whatever location I’m sharing. Again, this happensregardless of that toggle switch’s setting.
Those aren’t the only bugs I ran into while trying to use Apple’s Twitter integration. When composing a tweet in the pop-up dialog box, the system is supposed to auto-complete usernames. So, for example, should I want to address our fearless leader by his username, @jsnell, I would start typing “@js” and it would hopefully show me his name in the list, so I could tap it instead of typing the rest.

X Tweets the Spot: You can also send out a location via Twitter, which provides a link in Google Maps.
Unfortunately, there seem to be a handful of users whose names just won’t autocomplete—including our aforementioned editorial director. (It’s not just me, either—at least two of my colleagues verified they had problems with the exact same usernames, while others reported problems with auto-completing other usernames.)
Then there’s the Update Contacts functionality in Settings -> Twitter, which is supposed to not only let you add your friends’ Twitter usernames to their records in Contacts, but also add pictures for them. In order for this to work, though, your existing Contact record for them needs to contain the same email address that they use to log in to Twitter. If you don’t want to be findable in this method, you can flip the “Find Me by Email” slider to Off on a per-account basis in Settings -> Twitter.
However, even when I tried to have iOS 5 update my contacts, I routinely had it tell me that 0 contacts were updated, even when I knew for sure that I had all the data I needed. One of my colleagues did get this to work on a phone, but the majority that I polled saw the same message about no contacts being updated.
Apple also says that you’re supposed to be able to add your contact’s Twitter usernames to their entries in your address book, but not only did this not happen with the Update Contacts feature, neither my iPad nor my iPhone would even let me manually add a field for Twitter username—that option simply did not exist. The same was true for several of my colleagues, though the same one who got the contact updating feature to work did have these fields in his iOS address book.
For what it’s worth, making Twitter pervasive throughout the OS and allowing developers to hook into it is a great idea. Being able to snap a picture or video and upload it right there, without having to jump to your Twitter client, is handy and saves taps. And because iOS’s integration is limited to posting, notreading your Twitter feed, there’s plenty of space for third-party clients to survive.
All the news that’s fit to download
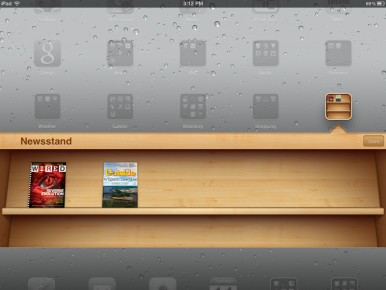
Extra, Extra: Newsstand displays the covers of the most recent issues of all your periodical apps.
Before the iPad’s release, many suggested that such a device could save publishers by finally giving them a digital platform that people want to read on. While it hasn’t been quite the groundswell that some anticipated, Apple has worked to provide a niche for periodicals and newspapers. However, the company’s subscription rules have irked many publications.
Newsstand is an attempt to sweeten the pot, the carrot to the subscription rules’ stick. It appears on the Home screen as a set of wooden shelves reminiscent of iBooks’s interface. Tapping on it expands Newsstand like a folder, displaying the latest issues of your periodicals, complete with an updated cover image. The issues can even be downloaded in the background so that when you wake up in the morning the freshest version of your publication is already waiting for you—no need to even launch an app until you’re ready to read. Newsstand’s icon will display a badge showing the number of new issues waiting; once you tap into the folder, new issues will be marked with a label.
Whether Newsstand will be successful at luring in publishers is hard to say. As of this writing, Newsstand-enabled apps were just beginning to become available and the section of the App Store that Apple has designated for those publications—and which you can access directly from the Newsstand folder—had not yet been launched. But over time, more and more publications have begun complying with Apple’s subscription rules, so it will be more surprising if they decide not to take advantage of Newsstand’s features.
Mail call
Of all the apps on the iPhone, Mail has probably seen the most updates since its original incarnation. iOS 5 is no exception: In this revision, the email client has added a number of new features that fill in gaps in functionality.

Flag Carrier: You can now flag messages in Mail, if you need to refer to them later.
My personal favorite is the ability to flag messages. I use flagging extensively on my Mac, to keep track of email messages that need responses or that I might need to refer to later. (Not the most efficient system, perhaps, but it works well for me.) Previously, if I got a message on my iPhone that I wanted to refer to later on my Mac, I generally had to leave it as unread, so that I’d be sure to remember it. (For a brief while, I flirted with a system where moving it to a specific folder would trigger a script on my Mac that would flag it, but that approach ended up being more trouble for me than it was worth.)
So, flagging is a welcome addition. For the most part, it has worked well for me, although I have noticed some bugs here and there, most of which appear to be related to mail accounts set up with Exchange (or, at least, accounts set up on Google via its Google Sync service, which uses Exchange.) Mostly, I’ve run into an issue where I flag a message on one device, but the flag doesn’t transfer to other devices. However, on my other accounts—MobileMe and a run-of-the-mill IMAP account—flagging transfers without any problem. You can even flag multiple messages by tapping the Edit button while viewing a mailbox, then selecting the messages and tapping the Mark button; you can also use this feature to mark several messages as read or unread.

Flags of Many Nations: You can flag several messages, or mark them read or unread.
Also worth noting: iOS’s flagging has just a single color: red. If you’re using Lion’s Mail to flag messages with multiple colors, be aware that they’ll all show up on your iOS device as flagged, but of the same color. And messages you flag on your iOS device will only show up in Lion mail as red.
Mail in iOS 5 also includes the ability to specify rich-text formatting—bold, italics, and underline. You’d be excused for not stumbling across this functionality, as it’s buried deeper than toxic waste. To format text you must first type the text you want, then select it, then tap the right arrow button on the pop-up menu, followed by tapping the “BIU” button, and finally tapping the type of formatting you wish to apply. This is, frankly, a pain, and I think will probably keep most people away from formatting. Even more frustrating, for those that actually use a Bluetooth keyboard with their iOS device, is that the standard Command-B, Command-I, and Command-U shortcuts don’t work.

Baby, You're a Rich Text: You can style text in Mail as bold, italics, or underline, but the controls are buried deep.
Really, this is illustrative of the overextension of some of iOS’s interface conceits. The pop-up menu was sufficient when the only options were selection and cut, copy, and paste. But now, when you’ve selected text, you have no fewer than seven options, several of which have sub-menus of their own. It’s crowded, inelegant, and—at the end of the day—un-Apple-like. But perhaps it’s just a matter of time before the company comes up with a better solution.
Contrast that gawky interface with an example of no-brainer design: iOS 5 now allows you to drag an address from one field to another in a message. So if you go to reply to a message and realize you’d rather put one of the recipients in a BCC field, you just tap and hold on their address then drag them down and drop them onto the BCC field. Voilà. It’s a little feature that should have been there ages ago (after all, you can do the same thing on the Mac), but it’s nice to see it arrive here.
Another much anticipated feature? The ability to search the full text of messages. Any number of us have probably tried valiantly to remember what a message’s subject was or who sent an email, when all we can recall is that it mentioned something about pandas. Supposedly, iOS 5 brings the ability to search the body of a message when you select “All” for your search criteria in Mail. Unfortunately, in my tests—and in corroborating tests by my colleagues—it doesn’t work in all cases. Of my three mail accounts—MobileMe, generic IMAP, and Exchange—searching the body of the message worked only on the IMAP account. On the others, it simply returned no results.
You can also now manually adjust the quote level in email messages. We’ve all found ourselves in email conversations that involve replies to replies to replies and so on. Now you can just tap in a paragraph (you don’t even have to select the text necessarily) and, in the resulting pop-up menu, tap the right-ward facing arrow. A Quote Level button will appear; tap that, and you’ll have options to either increase or decrease how indented that block of text is. You can also select a larger chunk of text, even if it includes materials of different quote levels, and increase or decrease their indentation all at once. There’s also an option in the Mail, Contacts, Calendars section of Settings to automatically increase the quote level when you reply to a message.
As mentioned in the PC Free section above, Mail has also benefited from some gap-filling, as it now features the ability to add or delete mailboxes on the fly from your device. It’s probably not something you need to do often—unless, of course, you don’t have a computer. In that case, it’s an invaluable addition.
Snap, edit, print
No improvements may tangibly improve the life of iPhone users as much as the addition of a few key Camera and Photos features in iOS 5.

Quick Draw: By double clicking the Home button, a Camera button appears next to the unlock slider..
Apple has made a huge push to make taking photos faster—even for those of us who won’t have access to the speedy new iPhone 4S camera. While your phone is locked, you can double click the Home button to get a new Camera button next to the unlock slider. Tap that and you’ll jump right into the Camera interface.
Doing so bypasses any passcode lock you may have set up on your phone, but don’t worry: The user can’t get into any other apps—if they press the Home button, they’ll go back to the lock screen, and access to the multitasking bar is altogether disabled. You also can’t browse any previous pictures in the Camera Roll, either (except for those that you take in that particular session). That said, depending on your friends, you might very well expect a few prank pictures to surface in your Camera Roll—which is also potentially awkward if you use iCloud’s new Photo Stream feature, since it automatically syncs those pictures to all your devices.
In a much-requested addition, you can also now click the iPhone’s volume up button to take a picture instead of tapping the shutter icon. This has the added benefit of making it much easier to take self-portrait shots, plus it gives you some tactile feedback, which is nice.
It’s also much easier to access the iPhone’s digital zoom. Instead of tapping and bringing up the zoom slider—which you can still do—you can now just use the standard pinch-to-zoom motion to zoom in right on the camera screen. While that’s handy, I found that I kept accidentally triggering a separate new feature—if you swipe to the right from the camera screen, it’ll actually take you right to the most recent picture you’ve taken (or to the Camera Roll, if you haven’t taken any). From there, you keep swiping to scroll back through your photos. To put it another way, the camera screen has now become the “top picture” in your Camera Roll.

Shoot to Thrill: The Camera app now includes a grid overlay option, and can lock autofocus and autoexposure.
If all that doesn’t quite do it for you, there are a couple of additional features that might aid your photo-shooting. For example, you can now lock the camera’s autofocus and autoexposure by tapping and holding any point on the screen—a blue reticle will appear and blink several times to indicate the lock has been established, and you’ll see AE/AF Lock printed at the bottom of the screen. Then, when you point the camera at other points, it will still remain focused and with the correct exposure for the point you initially selected—this can be handy for shooting pictures that contain both light and shadows. (Note that the iPhone 4’s front camera and both of the iPad 2’s cameras only support autoexposure, not autofocus.) There’s also a Grid feature—accessible by tapping the Options button at the top of the camera screen—that overlays a three-by-three grid over your camera view, letting you more easily compose your shots.
With all that advanced technology, you sometimes still don’t get the shot you were aiming for. Fortunately, Apple’s added simple photo-editing tools into iOS’s Camera and Photos apps, letting you crop, rotate, remove red eye, and generally enhance your photos.

Have Your Cake and Edit it Too: Photos and Camera now boast simple editing tools for cropping, rotating, red-eye reduction, and more.
The new tools are accessible by tapping the Edit button in either Camera or Photos when you’re viewing a picture; they replace the toolbar at the bottom of the screen while you’re in Edit mode.
For the most part, the tools work pretty well. Rotate and crop are pretty straightforward, though crop can also be used to constrain a picture to certain dimensions, and it lets you straighten photos as well, by using two fingers to rotate the image. The one-touch enhance button is lifted straight from iPhoto and attempts to tweak your images to look better—most of the time, I think it succeeds. You won’t find the kind of fine-grained adjustments that you get from Adobe’s iOS Photoshop app or other similar programs, but I think most users will be pretty happy with the results. It’ll even remove the red-eye effect, displaying a little animation that shows where it was applied.
If the auto-enhance doesn’t catch your red-eye problem—or you want to remove the flaw without using the rest of the enhance feature—you can also manually remove red-eye. Just tap the red-eye tool and then on the offending eye.
Of course, you can also tweet photos with iOS’s new Twitter integration (see above). With the deprecation of MobileMe, however, the option to send to Apple’s online service is no longer available. Instead, all of your photos will automatically be shared with iCloud’s Photo Stream, if you enable that option in Settings -> Photos.
Like Mail, Photos benefits from Apple’s effort to untether your mobile devices from your computer: You can now create, edit, and delete albums right from the app.
Everybody goes surfin’
Apple’s probably pretty confident that the browsing experience on its mobile apps still has a leg up over its competitors; Safari only receives a few updates in iOS 5.

Reading Is Fundamental: Reader formats text from a webpage, and strips out extraneous graphics and other elements.
Chief among these is the addition ofthe Reader feature that made its debut in Safari 5 on Mac and PC. Taking a cue from Web services likeReadability, Reader reformats the page you’re viewing to eliminate distractions—including, for example, ads—and make it easier to read. It also gives you access to controls that let you adjust the font-size for easier reading. The Reader button, which appears in the location bar of the browser, doesn’t show up on every webpage you view—it’s smart enough to determine when you’re on an article page.
On the desktop, I rarely use Reader, and I found I didn’t take advantage much of it on the iPad either—in both cases, the screens are large enough that I rarely have trouble reading text. However, with the iPhone’s limited screen real estate, Reader can definitely make reading an article a lot more pleasant, helping you avoid the constant pinch-to-zooming and panning that’s the hallmark of much iPhone surfing.

Take it as Read: Reading List lets you mark pages to read later, and syncs between devices with iCloud.
A second reading related feature, Reading List, also appears in iOS 5 after first debuting in Safari (version 5.1, in this case). Upon its introduction, many compared Reading List to popular Web service Instapaper, which lets you mark articles for later reading and providesan iOS app that can grab pages and let you read them while offline.
I’d go so far as to say that Reading List and Instapaper have very little in common. While both can be used as reminders to read certain pages later, Reading List’s functionality is very limited. In fact, it essentially acts as a special bookmark folder that—if you use iCloud—is synced between your iOS devices and your computer.
Say you come across an article while browsing on your iPhone that you’d prefer to read on a bigger screen. Just tap the Share icon in Safari’s toolbar and then the Add to Reading List button. (On the iPad, you can also tap the Plus button in the Reading List section of the Bookmarks popover.) That page will now be added to your Reading List, which you can access at the top level of your bookmarks, along with the site’s icon and the first couple lines of the page’s text. You can also tap and hold on any link on a page to get a menu with an Add to Reading List option.
Reading List can also track when you’ve accessed a page; you can tap the Unread button to see only the pages you haven’t looked at yet. Be aware that the read state is synced between devices, so if you look at a page on your iPad, it will also be marked as read on your iPhone. Your entire Reading List is still available if you tap the All button at the top, and to remove an entry, you just swipe your finger across it and tap the Delete button. Unfortunately, the lack of an Edit button means that there’s no way to remove multiple Reading List entries at once.
Unlike Instapaper, Reading List does not cache the contents of the page itself, so you’re out of luck if you want to read one of your links while you’re not connected to the Internet. It also lacks Instapaper’s tweakable appearance and social features, like the ability to easily share your lists with your friends. In short, it’s hardly a replacement for Instapaper, but it’ll likely be a handy tool for all those who aren’t familiar with the service. Even as an Instapaper user, I still found Reading List useful as a quick way to share links between my many devices: It’s great when you’re running out the door, but you want to have easy access to, say, a page with some directions on it.
For those browsing on an iPad, Apple has reworked how users manage multiple webpages. Instead of the previous iPhone-style model, where tapping a button gave you a bird’s-eye view of all your open webpages, you now have a tabbed model more akin to desktop browsing.

Put it on the Tab: Tabbed browsing on the iPad now resembles Safari on the desktop, rather than the iPhone model.
The tabs sit slung under the bookmark bar (or the location bar if the bookmark bar is hidden); tap on any of them to bring that page to the foreground. As with the previous iPad version of Safari, you’re still limited to opening nine simultaneous webpages. However, like the Mac version of Safari, you can also arrange your tabs in any order you like by tapping on them and then dragging them to wherever you’d like. It would be cool if Apple had also added the Open in Tabs option that Safari boasts on the desktop, which lets you open a folder of bookmarks, each in a separate tab, but, alas, you’ll have to open all your bookmarks individually.
There’s also a new option to open links in the background, which elicits a relieved sigh from me, and probably more than a few of you as well. In Settings -> Safari, you’ll find an Open New Tabs in Background slider on the iPad and, on the iPhone, an Open Links option that lets you choose In Background or In New Page. Enabling background links in either case means that when you tap and hold on a link, the resulting menu gives you the option to open that page without whisking you away to it immediately. As someone who tends to open a lot of links from a single page when I’m doing research, it’s a huge improvement. And, if you don’t like it, you can always stick with the old behavior.

No Peeking: iOS's privacy mode keeps your Web history and searches under wraps, and looks cool while doing it.
Finally, iOS’s Safari now incorporates a Private Browsing mode, just like Mac OS’s Safari. When you activate this mode in Settings -> Safari, you’ll be prompted to keep or dump all of your current open tabs. Once you start browsing, the browser’s history will not record any of the sites you visit, nor will any terms you enter in Safari’s search box be saved. And, to remind you that you’re currently in Private Browsing mode, Safari’s toolbars will turn black instead of their usual blue/gray. When you leave Private Browsing mode, you’ll once again have the option to ditch all your open tabs or keep them open. For those who share iPads among multiple users—in a family, say—it’s a useful addition.
The games we play
Several months ago, I lodged a number of complaints about Game Center, Apple’s social networking service for iOS games. Not long after, Apple first introduced iOS 5, which would seem to address several of my criticisms.

Portrait of the Writer as a Young Man: Game Center now lets you add a profile picture.
For example, Game Center profiles now allow you to add a picture, letting you make sure that the John Smith you just added as your friend is in fact the John Smith you know. In addition, you can browse your friends’ profiles to see if they have friends that perhaps you’d like to add to your own list. In fact, Game Center will even recommend friends to you based on the games that you own and the people you’re already friends with. You can also upload your contacts to get better recommendations, though I didn’t notice any particular improvement having done so. (Perhaps I was already friends with everybody I knew that had a Game Center account.) And, if you feel the need to stack yourself up against your so-called friends, you can now judge your self-worth on a new overall point value, based on your achievements and game scores.
Of course, since Game Center is, for Apple at least, largely a way to drive adoption of games, there’s also a game recommendation feature that suggests titles based on those your friends have played, those similar to games you have played, and just those that are popular overall. Apple’s even integrated the App Store right into Game Center, so that you can purchase and download games without ever leaving the app.

Six Degrees: You can also now browse your friends' friends lists to find more people to game with.
One of my other gaming complaints looks to be addressed by the forthcoming launch of iCloud, which will provide developers with a way to synchronize your game states between iOS devices. So if you start playing Super Stickman Golf on your iPhone, you won’t have to replay all those courses to unlock your powerups on your iPad.
There are still some more features I’d like to see added to Game Center. While iOS 5’s new notifications system makes it less likely for you to lose a game invite, I’d still like to see a built-in messaging system—or, at least, tighter integration with iMessage. And an online status system to let me know when my friends are playing games might make launching Game Center more imperative than it is now.
Music to your ears
Apple has at last standardized its media apps across the platform. Previously, the iPhone featured an all-in-one iPod app, the iPod touch had Music and Video apps, and the iPad had an iPod app and a Videos app. Now, all three devices have separate Music and Videos apps. Not much has changed about the apps on the iPhone and iPod touch, except for the addition of a Store button in the top left, which takes you to the appropriate section of the iTunes Store.
However, the Music app on the iPad has been given a significant top-to-bottom redesign. Previously, it bore a strong resemblance to iTunes on the desktop; now it’s wholly its own creature, with faux-wood siding reminiscent of GarageBand.
Tune Up: The iPad's Music app has gotten a complete overhaul in iOS 5, with a faux-wood finish.
Also, an update to version 1.3 of Bluetooth’s AV Remote Control Profile (AVRCP) means that now, when you stream your music to a Bluetooth device, it can also display track, artist, and album information. And Smart Playlists will now sync from iTunes to your iOS device.
Like Photos and Mail, Music and Videos both benefit from Apple’s PC Free effort. For example, you can now create, edit, and delete playlists on iOS devices themselves; you can also delete songs and videos by swiping your finger across them and tapping the delete button. But Apple is holding tight to its media ecosystem: You still can’t add audio or video files to the Music and Video apps that aren’t from iTunes on your computer or through the iTunes Store. So, for example, if you want to download a podcast that’s not on iTunes, or save a video from the Web, you’ll still need to use a third-party app or turn to iTunes as an intermediary.
Save the date

Year to Date: Calendar on the iPad now has a year view reminiscent of iCal on Lion.
Calendar gains a few nice enhancements of its own, despite a lack of time in the spotlight. For example, the iPhone version of Apple’s Calendar app now features a week view, which you can access by turning the phone into landscape orientation. The iPad version hasn’t been left out, though—it now features a year view, with the same heat-map-style display that you’ll find in the Lion version of iCal.
On the iPhone, you can now swipe between days in the day view, which is much more convenient than tapping the little arrows at the top of the screen. Apple’s also streamlined the event entry process on the iPhone by pre-selecting the Title field and making it so that you don’t have to drill down into the Title, Location, or Notes fields. iOS 5 also offers default alert times for Birthdays, Events, and All-Day Events.

Week Sauce: On the iPhone, meanwhile, Calendar now has a week view when you turn the phone to landscape.
For those who set a lot of alerts to remind themselves of things, the last can be quite the time-saver. For each type of event, Apple provides a number of common options—for example, you can opt to be reminded of birthdays at 9 a.m. on the day of the event, one or two days before the event (also at 9 a.m.) or a week before. Over course, you can always override those default alarm times with one of your own choosing when you’re creating the event.
Calendar also now supports a more touch-friendly process of editing your calendars. For example, you can drag events from one day to another, move them earlier or later by dragging, or resize them by tapping on them and adjusting the handles that appear. You can also create a new event by tapping and holding at the desired time in the Day view, or a new all-day event by tapping and holding on a day in the Month view.
As part of iOS 5’s PC Free features, Calendar now also allows you to rename, delete, and add calendars right from your device, though you can only create calendars on an iCloud account—Exchange-based accounts have been left out of the mix. You can also change the color of a calendar, though you’re limited to one of the seven hues that Apple offers.
On the big screen
Critics derided the iPad as nothing more than an oversized iPod touch, but the device’s larger screen means that it changes not only how much information you can see, but also how you interact with it. In iOS 5, Apple has rolled out a number of iPad-specific features.
Splitsville: You can now drag the keyboard on the iPad up to get a split version, making typing potentially easier in some orientations.
Split keyboard Way back before the original iPad was released, I speculated how we might type on such a device. One of my theories?
You can’t hold it in landscape orientation and use your thumbs to type—they won’t reach the full width of the screen (unless Apple does something wacky like putting half of a QWERTY keyboard on each side of the screen).
Well, of course, I was wrong about the landscape keyboard (although I still find it difficult to type on sometimes). But the split keyboard has finally come to fruition; you can enable it in Settings -> General -> Keyboard. In fact, the iPad’s keyboard can now be split andundocked from the bottom of the screen, letting you slide it to a desired height. You can drag the keyboard by pressing and holding on the Hide Keyboard button at the bottom right and sliding the keyboard, or you can tap and hold until a menu pops up with the options to Undock or Split. (Once you’ve split it, you can tap and hold the same button to get a Dock and Merge option.)
Though it takes some getting used to, I kind of like the split keyboard design, especially in landscape orientation, where reaching those keys in the middle of the screen can be a stretch. In portrait orientation, the ability to slide the keyboard (either split or whole) up and down the screen also makes the iPad far more comfortable to hold. It’s also yet another point in favor of software keyboards, allowing for variation without having to reconfigure expensive hardware.

Four Finger Salute: On the iPad 2, you can now enable multitasking gestures to let you quickly switch between apps and more.
There are three multitasking gestures in iOS 5, led by the ability to close an app by doing the five-finger pinch gesture on the screen. You can also reveal the multitasking bar by swiping up with four fingers and hide it again by swiping down with four fingers. Finally, you can switch between apps by using a four-finger swipe to the left or right.
The last is by far the most useful, especially if you find yourself switching between two apps—say, Safari and Mail. Previously, to paste information from Safari into Mail, for example, you used to have to select the text in Safari, double click on the Home button, tap Mail, and paste—then repeat for each piece of text you want to copy. It was almost just as fast to go back to the Home screen each time. Now, instead, you can select your text in Safari, swipe to Mail, paste, and then swipe back to Safari.
One benefit of the multitasking gestures is that, unlike the Home button, which—depending on how you hold the iPad—can be on any edge of the device’s bezel, gestures are always the same, relative to the user.
The big problem with gestures, though, is that some apps already depended on using those same gestures within themselves—example, the popular game Fruit Ninja, in which using multitouch gestures is a key part of the strategy. Unless the developers change the app—which they very well might not want to do—you may have to disable multitouch gestures in Settings whenever you want to use those programs.
Chances are most people will never find the gestures, even though they are enabled by default—as, I’m sure, many people have never discovered the multitasking bar unless they’ve accidentally double clicked the Home button. And many will likely activate them in Settings, but still forget to use them. Still, it’s a nice option for power users, and one of those features that seems like magic when you pass it on to your less technically savvy acquaintances.

Mirror, Mirror: The iPad 2 and iPhone 4S can now mirror everything you seen on their screen to an Apple TV-connected display.
AirPlay Mirroring Technically it’s not an iPad-specific feature, since it only works on the iPad 2… and the newly announced iPhone 4S. But I imagine this feature, which wirelessly displays an iOS device’s entire interface on an HDTV connected to an Apple TV, will get more use on the iPad. Mirroring expands AirPlay, which was introduced in iOS 4.2 as a way to stream photos, audio, and video to an Apple TV.
Not every app elects to take advantage of AirPlay. In cases where they don’t, you can mirror the interface by tapping on the AirPlay button in the multitasking bar, selecting the Apple TV, and swiping the Mirroring slider. Now everything you see on your iPad, from the Springboard to Safari, will be displayed more or less simultaneously on the big screen.
Keep in mind that since the iPad’s display is not widescreen you’ll have black bars on either side of the image (unless an app has its own AirPlay mode, in which case it can take advantage of the full width of the screen).
This is a killer feature for educators and others who frequently do demonstrations, but beyond that it has fascinating applications in games. Firemint has already announced an update to its popular Real Racing 2 that will enable a Party Play mode which does some extremely clever things using AirPlay—including displaying a split-screen of up to four players on an HDTV.
Access granted

While we think of iOS devices as extremely easy-to-use, there are plenty of people for whom a touchscreen is less than ideal—especially those folks with disabilities. Apple has made an attempt to improve its devices’ accessibility with each subsequent software release; with iOS 5, the company has made far-reaching enhancements to accessibility across the board.
VoiceOver, first introduced in iOS 3, helps visually-impaired users navigate their iOS device by providing feedback via a synthesized voice and letting them use simplified gestures to interact with the touchscreen without having to see what’s on it. It gets a few improvements in iOS 5, including the addition of a compact voice option that (to my ears, anyway) sounded much better and more human when activated.
There are more options for the Rotor interface as well, including Volume, Hints, Search Fields, and more. In addition, iOS 5 now supports the expanded Eight-dot Braille configuration on Braille displays, and there’s an option for how VoiceOver should navigate images (options include always, with descriptions, and never).
In addition, users can now enable a text-to-speech option by enabling the Speak Selection option under Accessibility. When you select text in any app, a Speak button will then appear over it—tap that, and a computer-generated voice will read the selected text; during the speech, the Speak button will turn into a Pause button.
For the hearing impaired, iOS 5 now offers a Hearing Aid Mode that can improve compatibility with assistive devices, though it also warns it may reduce 2G cellular coverage. Plus, in addition to the Mono Audio capability that’s been around for a while, you can now adjust the balance of audio, even shifting it entirely to either the left or right channels. You can also have incoming calls automatically routed to the iPhone’s headset and speaker (or to the default audio output) and, on the iPhone 4, you can also choose to have the LED Flash blink when an alert goes off. Unfortunately, that feature did not appear to work in my tests—the sound and vibration went off as expected, but the light did not illuminate. Most of the colleagues I polled said they couldn’t get it to work either; one said that though it didn’t work when he first enabled it, it started functioning correctly later on.

Good Vibrations: iOS now supports custom vibration patterns, which can serve as a sort of Caller ID for users with visual impairment.
There’s also a nifty new feature that may even appeal to those who aren’t hearing impaired: custom vibration patterns. In the same way that you can assign a custom ringtone or other alert sound, you can now select a distinct pattern of vibrations. Apple provides a handful—the standard Alert, Heartbeat, Rapid, SOS, and Symphony (Beethoven’s Fifth, if you must know)—but you can also create your own in a nifty interface where you tap out the pattern and record it. You can also assign custom vibration patterns to individual contacts, so you’ll know when your significant other is calling without even taking your phone out of your pocket.
VIP Access: Users with motor impairments can take advantage of iOS's new AssistiveTouch technology to perform complex gestures and actions.
iOS 5 also includes accessibility features for a whole new class of users, those with motor impairment. The new AssistiveTouch feature adds a button that can be docked to one of the screen’s corners or along the sides (though not the bottom or top of the screen). Tapping this button summons an overlay menu that gives access to a variety of the device’s features, including a software Home button, screen rotation, screen locking, volume controls, muting, and device shaking. It also lets users simulate multitouch gestures with a single finger so, for example, you can mimic a two-finger tap, where necessary.
You can also record custom gestures and store them in a Favorites pane in case there are apps that require certain types of multitouch gesture. By default, the Favorites pane includes iOS’s pinch gesture, allowing disabled users to perform it with a single finger.
All in all, the improvements in iOS 5 help make Apple’s devices some of the most accessible to date. But it’s not without limitations. One major shortcoming is any sort of speech-to-text capability, a feature the company recently demonstrated running exclusively on its new iPhone 4S. Given the capability of third-party dictation apps like Dragon Dictation, it’s hard to imagine that the iPhone 4, at least, couldn’t handle systemwide speech-to-text functionality. Providing a system-level dictation feature to more than just users of the latest and greatest device would have been a great help for those users who have trouble typing on their current iOS devices.
The dirty dozen (minus one)
For every feature that gets shown off at an Apple keynote, there are a dozen waiting in the wings for their chance to shine. Here’s a handful of smaller features in iOS 5 that didn’t quite make the top ten.

I Know a Shortcut: You can create text shortcuts for commonly used phrases, to speed up typing.
Shortcuts: Typing on iOS’s virtual keyboard is a lot slower for many, so some users have turned to text-expansion utilities like Smile’s venerable TextExpander. In iOS 5, Apple has essentially hijacked the system’s love-it/hate-it autocorrect system to provide limited shortcut functionality. Navigate to Settings -> General -> Keyboard -> Shortcuts, and you can assign a phrase, like “See you soon!” to a short abbreviation of text, like “sys”; when you type that shortcut, you’ll see the expanded phrase show up in iOS’s autocorrect bubble. (As with a spelling correction, you can tap the autocorrect bubble if you don’t want it to trigger.) The upside is that, unlike TextExpander, iOS’s shortcuts feature works systemwide—TextExpander only works in apps which have built in support for it (or via copy-and-paste). However, power users may still opt for TextExpander’s snippet syncing, shortcut groups, and handy automatic snippets, like inserting the current date.
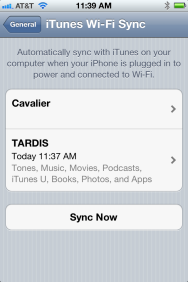
Sync-ing Sensation: iOS 5 allows you to sync your media over Wi-Fi, even with multiple computers.
Wi-Fi Sync: Another feature that’s been on our wish list for sometime, Wi-Fi Sync helps distance iOS devices from your Mac or PC even further. No longer do you have to plug your mobile device into your computer to download that song or movie—now you can do it over your local Wi-Fi network. And, regardless of whether you’re syncing via a cable or over Wi-Fi, the process now runs on the background on your iOS device, meaning you can keep using it even as it’s updating. You can also set up a device to sync, via Wi-Fi, with more than one computer, if you have your music on one Mac and your Photos on another, for example.
Maps: Aside from the addition of Twitter support (see above), iOS’s Maps app will now suggest multiple routes when you ask for directions, where applicable. Routes are displayed on the map overlay, along with clear labels—Route 1, Route 2, Route 3, etc. Tapping any route will display the distance and estimated time for that particular option, along with the major roads or routes taken; you can then step through the directions of your selected route as usual.

Route of the Problem: Maps now provides you with multiple routes for directions.

Weather the Storm: Weather can now give you the forecast for your current location, along with an hourly breakdown.
Weather: Largely unchanged since the iPhone was first released, Apple has finally given Weather a couple of minor improvements. There’s the new Local Weather feature, which gives you the forecast based on your current location; when enabled it always appears as the first “card” in the Weather app. Also, you can now get a scrollable hourly forecast for the current day and part of the next by tapping or swiping down on the daily forecasts. Still, the app lacks most of the features of competing third party apps, including such niceties as radar maps.
Stocks: Weather’s partner in crime, the Stocks app has gotten only a minor change in iOS 5: the addition of Live Quotes where available. To date, most stock figures on iOS have been delayed by 15 minutes. Now you can watch the economy dip in real time, if you’re feeling masochistic.

Definition of the Term: The dictionary that first appeared in iBooks is now accessible systemwide in iOS 5.
Dictionary: Since its launch, iBooks has included a built-in dictionary that lets you quickly look up definitions. In iOS 5, Apple has expanded the dictionary systemwide; now pretty much any place you can select text, you can look up a word’s definition. Just select a word and tap the Define button that appears. It’ll even include information from a biographical dictionary as well.
Custom sounds Ever since the introduction of custom ringtones—heck, maybe even before that—iPhone users have clamored for the ability to set custom sounds for text messages, calendar reminders, and so on. Apple’s finally acquiesced: In iOS 5 you can assign custom sounds for texts, voicemails, new mail, sent mail, tweets, calendar alerts, and reminder alerts. And not only can you choose from Apple’s included sounds, but you can import your own by dropping them into iTunes, just as you would a custom ringtone.
FaceTime: Now, when you’re engaged in a phone call and somebody sends you a FaceTime request—or, when you’re involved in a FaceTime call and someone else tries to call or FaceTime you—you’ll get a screen that lets you choose to either ignore the incoming call, or to end the current call and switch to the new call. You’ll also find a FaceTime button at the top of every conversation in Messages, and Apple claims to have improved FaceTime video quality.

Call Management: iOS 5 allows you to remove calls from your Recents by swiping and tapping delete.
Phone: Incoming calls from unknown numbers now display their geographic location when the phone rings (unless, of course, the caller ID information is blocked) and you can manually prune your Recent calls list by swiping across any entry and tap delete.
Voice Control: While not as shiny as the iPhone 4S’s new Siri voice recognition feature, iOS 5 does expand Voice Control in one notable way: You can now use it to make FaceTime calls in addition to traditional phone calls.
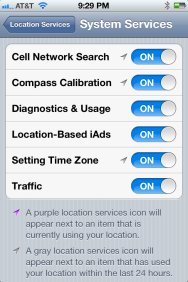
All About Location: You can now disable system-level location features in Settings.
Location Services: Location has been a contentious issue for Apple, given the kerfuffle earlier this year over iOS devices containing databases of location information. In iOS 5, Apple is determined to show it’s on the side of the angels. The Location Services section of Settings has been redone yet again: In addition to providing a master On/Off switch and the ability to enable and disable location for every app that uses it, there’s now granular control of System Services. You can disable location access for Cell Network Search, Compass Calibration, Diagnostics & Usage, Location-Based iAds, Setting Time Zone, and Traffic. And you can decide whether you want the location status bar icon to appear when those services are accessing your location. That’s a heck of a lot of control and, while more than most people will likely use, it’s certainly a good way to maintain transparency with such a sensitive subject.
Central IT’s buying advice
As with previous iOS updates, iOS 5 is totally free. As such, it’s hard to argue against installing it, especially as developers begin to take advantage of more and more of the under-the-hood features it offers.
But that’s not to say that this initial release is all sunshine and daisies. I ran across quite a few bugs and flaws in the software as I tested it, and while none are significant enough to recommend against upgrading, this strikes me as the least polished major iOS update in quite some time.
It’s also the most ambitious update thus far, raising the possibility that Apple has overextended itself and reached for too much. Still, this is the update that sets the tone for the next stage of iOS devices. The PC Free features alone seem set to broaden the appeal of Apple’s mobile platform, since it no longer requires being tethered to a computer. Rolling out devices in corporate and educational environments would seem to be much simpler as well.
There’s also a lot of maturity here: We’ve gone from no notifications, to push notifications, to Notification Center. Apple’s now been at this long enough to be able to revisit the things it’s done before and change them—for the better. It’s hard to believe at times that iOS, as a platform, is now into only its fourth year, when it’s had such an enormous impact on mobile computing. By contrast, Mac OS X has entered its seventh revision in ten years—just imagine where iOS will be when that milestone rolls around.
