

There will undoubtedly be times when you are away from your Mac but need to access a file or two on it. While the advent of services like iCloud Drive, Dropbox, Google Drive, Box.com, OneDrive, and MediaFire have made accessing your files easier, most of them require you to organize your files in specific synchronized folders on your Mac.

They also have the drawback of storing your files on third-party servers, which might not be the most desirable place for personal or sensitive information.
If you would like to remotely access files that are stored on your Mac, there are several ways to do it. But before doing so you will need a way to access your Mac from wherever you are on the Internet. There are a number of “dynamic DNS” services that can do this, but perhaps the most convenient (and arguably best) option is to use Apple’s Back to My Mac service.
Setting up Back to My Mac
Configuring Back to My Mac isn’t difficult. Just follow these steps:
- Create an Apple ID if you don’t have one.
- Log into iCloud in the iCloud system preferences.
- Enable the “Back to My Mac” service.

At this point, any Mac you have similarly configured with iCloud should be able to access the one you set up with Back to My Mac. Keep in mind that Back to My Mac requires that the remote Mac be connected to the Internet. Also, it should be configured to wake on demand so that when it’s asleep, it can act on a Back to My Mac request. To help ensure that this happens, launch System Preferences, choose the Energy Saver preference, and enable the Wake for Network Access option.
Another issue you might run into is if your network has a firewall configured that prevents Back to My Mac access. If you can set up Back to My Mac but cannot seem to connect from a remote location, you might need to check your router's settings to ensure UPnP, or NAT-PMP services are enabled. In addition, check or reset your router's firewall (toggle it off, and test the connection), and also update your router's firmware to its latest version. It’s a good idea to test such a connection from a local coffee shop before needing to use Back to My Mac for mission critical work.
When Back to My Mac is set up, you have several options for connecting to your remote Mac—opening programs and files directly on it, copying files to and from it, and controlling it remotely from the command line. Here’s how they shake out.
Share another Mac’s screen
The most intuitive way to access and manage your remote Mac is Screen Sharing, which streams the desktop view from your remote computer to the Mac you’re currently using. While the performance of this service depends on the speed of your broadband connection, you can use this to work as if you were sitting in front of your Mac.
To enable Screen Sharing, go to the Sharing system preferences, enable the Screen Sharing service, and ensure that your user account is allowed access. By default only administrators are given access, but you can add specific users to the list or select the option to allow all users. When done, you can select your Mac in the Finder sidebar of another Mac configured with the same iCloud account and then click the option to share the remote Mac’s screen and open applications and documents on it.

Screen Sharing supports additional options such as synchronized clipboards and drag-and-drop support for file sharing. With these, you can drag files from the Finder in your current Mac to the screen sharing window to copy them to the remote computer. You can similarly copy files from your remote Mac. To use the shared clipboard option (enabled by selecting “User Shared Clipboard” in the Edit menu), copy any selected text or images on either Mac and the data will stream to the clipboard of the other. Then you can paste it by pressing Command-V.
Since OS X supports multiple user accounts, you may connect to your remote Mac when another user is logged on. In these instances, Screen Sharing supports multiple sharing sessions. In this scenario you are given the choice to either log into your account behind the scenes or view what the current user is seeing (with his or her permission). Note that for either approach, anyone sitting at your computer will see an indication in the status menus that you are logged on.
Finally, while Screen Sharing can be set up for your personal Macs, this service is not limited to your own computers and can be used to connect to any others on a local network with Screen Sharing enabled. Additionally you can request screen sharing access to a friend’s Mac via Messages. (Yosemite now allows you to do this between two people with iCloud accounts. Under Mavericks you could do this only via a third-party service such as AIM, Jabber, and Google Talk.)
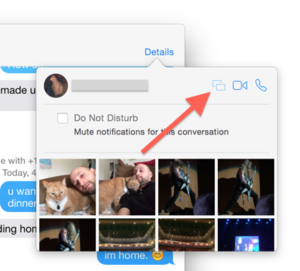
When chatting with a friend or colleague using Messages, you can click the Details button at the top of the conversation, where you will see options for communicating with your contact. One of these is a pair of overlapping rectangles, which, if available, will allow you to view the screen of your contact.
File sharing
If you wish to only access your remote Mac’s files and not deal with a potentially slow Screen Sharing experience you can do so by accessing your Mac’s files directly. Provided you have enabled the File Sharing service in the Sharing system preferences on your remote Mac, when you select that remote Mac in a Finder window’s sidebar on your current Mac, you will see the various default and custom shared folders appear, which you can mount and then navigate through to access the files you desire.
Remote Login
Another approach to managing your Mac remotely is arguably for power users, where you enable the Remote Login service and use the secure shell (SSH) in a Terminal window to login and run commands and scripts on your Mac.

Remote Macs with Screen Sharing and File Sharing enabled will appear in the Finder sidebar. If you enable only Remote Login, the remote Mac won’t appear. But you can access it via the Terminal app. To do this, launch Terminal (/Applications/Utilities), and then press Shift-Command-K (or selectNew Remote Connection from the Shell menu). This produces a New Remote Connection window. Within this window select the Secure Shell service and you should see any enabled Macs in the Server column. From here you can select and connect to these Macs to log into them.
Other services
The services I mentioned so far are automatically detectable; however, there may be additional services that you have on your Mac that are not detectable in these ways. These can include custom FTP software, web servers, license managers, or other server software you have configured. If you have such software enabled, you can still connect to it using Back to My Mac by assembling a URL that points you to your Mac from anywhere on the Internet.
To do this, enter the following command in Terminal to list a hierarchy of domains for your iCloud account:
dns-sd -E
When entered, you will see an output similar to the following (the NUMBER will be a unique ID for your iCloud account):
With this information, you can assemble the URL for directly accessing your remote Mac, provided you have the computer name for it (your Mac’s computer name is the name entered at the top of the Sharing system preferences). For these purposes, we are going to use the Bonjour name, which uses only lowercase letters, strips out all punctuation, and replaces spaces with dashes. So, for example, if I have “Topher’s MacBook Pro” as my computer name, then the bonjour name will be “tophers-macbook-pro” (we are leaving out the .local suffix here).
With this, the URL scheme for accessing the remote Mac is the following:
computer-name.NUMBER.members.btmm.icloud.com
In this context, if my account number is “12345678,” to access my MacBook Pro I would use the following:
tophers-macbook-pro.12345678.members.btmm.icloud.com
I can now specify this for various connectivity services that are not supported directly in the Finder—such as SSH and SFTP—and even third-party servers and services I have configured on the system. For example, if I have the OS X CUPS web interface enabled on a remote Mac, I can connect to it to configure my printers by specifying port 631 in a URL similar to the following:
http://computer-name.account-number.members.btmm.icloud.com:631
This Back to My Mac address is quite versatile and can be used for more than just accessing one Mac from another. If you have any system, be it an iOS device or Android phone; a Windows PC or Linux system that support SMB file sharing, SSH connections, Web connections, and others; then you can use this Back to My Mac address on these systems to point them to any of your configured Macs.
As a final note, while sharing services have their conveniences, unless you use them regularly you might consider keeping them disabled. While there are no known hacks for these services, and they are built off of reputable and secure coding, best practices are to keep services off that you don’t intend to use.
